 If you have a leak under your shower door, you probably need to check the area in between the door and the threshold. Chances are, the shower door sweep is gone or damaged.
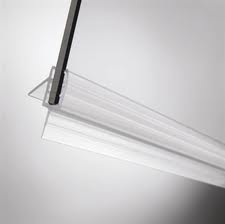
A shower door sweep is simply a strip of flexible rubber that covers this area and prevents water from escaping through the gap. These can get warped from rubbing on the threshold or completely fall off of the shower door.
Some sweeps are held on with screws and others are caulked into place. The trick is to find the style that you have and replace it. Some sweeps slide along a rail, but you have to get the right one to fit. If you have the old door sweep, you can take it with you to get a match. Try a home center first, and if they don’t carry it, go to a glass company that installs shower doors. If they don’t carry it, they can order it for you.
Reinstalling the new sweep with either involve sliding it back into place, caulking it, or screwing it back on to the bottom of the door.
By the way, letting water leak out here for too long can result in some large expenses. We recently had a customer that let this go on too long and he eventually had to have some remediation done from the water damage.
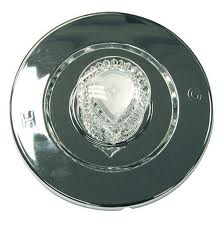 Caulking the shower means removing the old caulking and applying a new bead of caulking. This can also apply to the fixtures penetrating through the wall. Most of the time, the penetrations (the shower handles, shower arm, and tub spout diverter-if it is a tub/shower combination) have escutcheons around them.
The escutcheons should sit tight to the wall, but in many cases they don’t. This can leave room for water to enter the wall cavity. If this happens repeatedly, then you can have problems with water damage. As long as you are caulking the shower anyway, it’s probably a good idea to caulk around the perimeter of the escutcheons.
It’s your choice what color to use (either the color of the wall surface or clear), but make sure the caulking is for wet areas, like silicone. Make sure the shower is dry before you start and stays dry after you are done. A good rule of thumb is to not use the shower the day before and the day after you caulk it. Check the manufacturer’s recommendations…some say let it dry for 24 hours and others for 48 hours. The key to a good caulking job is preparation and then application.
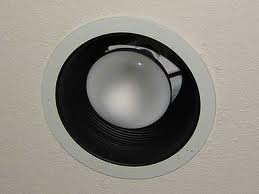 You turn on the bathroom light fixture and all is well until the fixture “clicks” and turns off. This is actually pretty common. In most cases, the fixture is getting too hot and turning off. There is a high temperature limit switch that does this. So how can you fix it?
The fix is to lessen the amount of heat getting to the switch. This can be accomplished in a variety of ways.
Heat commonly builds up from standard light bulbs. Flood-type bulbs seem to be a common thread. If you like that style of bulb, you can lower the bulb closer to the floor, which is further away from the switch. To do this you will need to remove the bulb and loosen the wingnut on the side of the can fixture. This will allow you to slide the socket up or down. You want to move it down, but not so far down that the bulb sticks out of the ceiling. Move it down a little and see if the problem recurs. If the fixture does turn off again, you can move the bulb down a little further.
Probably the easiest thing to do is to replace the standard bulb with a bulb that doesn’t generate as much heat. You can use LED bulbs or CFL (compact florescent) bulbs for this.
 Plumbing water to a refrigerator can be trying if you have a lot of obstacles to overcome. Certainly, connecting water to the icemaker is easy if there is already a water valve installed behind it, but this isn’t always the case. Ideally, the nook for the refrigerator will be next to the cabinets with no break in the base cabinets at all. So long as there isn’t a doorway running in between the refrigerator nook and the kitchen sink, the installation should be straightforward.
You will need to replace the cold water angle stop beneath the sink with one that has two outlets (conversely you could use a saddle valve, but I hate these). Replace the angle valve and connect the water supply line to it. You will have to drill small holes through the side wall of the base cabinets and feed the line through it. Locate the hole as far back and down as you can so that the line doesn’t get pinched or damaged. If you come to a corner, you can turn the corner the same way as drilling through a straight row of cabinets, you just may need a longer drill bit to reach.
Once you reach the refrigerator nook, you can connect the water line with a compression fitting. You will be able to control the water to the refrigerator by the valve under the kitchen sink.
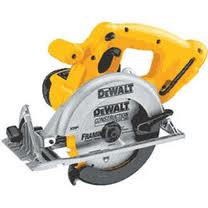 Replacing an interior door is tough enough for a beginner…especially if the door doesn’t fit. You find this frequently when buying a door from a large home center. They will be about ¼ inch too wide. So to add to the misery of mortising the hinges, you get to rip the door to fit.
A table saw is great for this, but you risk scuffing the door as you push it along on the table saw. In the field, a circular saw is ideal. The only trick is making a straight cut on the hinge side of the door. A guide is a big help, but if you don’t have one, you can use a steady hand.
One concern with a circular saw is tear out. As the blade pulls up through the surface of the door, the top edge along the cut may splinter out. It’s probably not a huge deal with the back edge of a door, but it is something to be mindful of. You can place a piece of blue painter’s tape along the cut line to minimize tear out.
If all this sounds too daunting, you can buy a door from a door shop. You won’t have to cut these down as they come in the correct size. You will however, need to mortise the hinges.
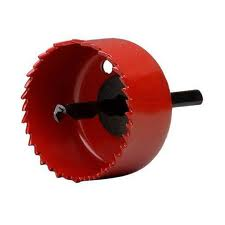 There are several reasons you might want to do this carpentry job: cutting a hole in your countertop. Maybe you are adding an under-sink soap dispenser, or maybe a reverse osmosis system. Whatever the reason, the job doesn’t take a lot of knowledge. You simply need to determine the size of the hole and get busy cutting it.
You will need a drill and a hole saw. A hole saw is a circular tool attached to a drill bit. This allows you to stick it in a drill, which spins it around and cuts the hole. The drill bit sticks out the farthest and this is the first thing to contact the surface to be cut.
Mark the countertop where you want to start the cut. The drill bit will start to drill into the surface. Once it reaches down, the teeth of the hole saw contact the surface. The key here is to hold the drill at a point where all the teeth of the saw are cutting uniformly. If the drill is leaning to one side, only that side of the hole will get cut. This will make the drill wobble. Listen for the sound the saw makes as it cuts. It too should be a uniform sound. If the sound is loud and then soft, the drill is not in a plumb position.
Once you have cut halfway through the countertop, remove the drill and cut the rest of the hole from underneath the counter. The reason is that a lot of hole saws don’t have the depth to cut the entire thing in one shot. In addition you won’t have any tear-out of the surface.
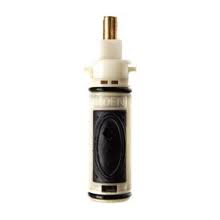 Low hot water pressure can be confusing to some people. People immediately think the water heater is to blame, but that isn’t always the case. If you have hot water, the problem isn’t the water heater. Incoming water pressure pushes water into the water heater and then out to your fixtures. The problem is more likely with your fixture or a valve somewhere.
The big question is, do you have low water pressure in the entire house or just one fixture? The key is to isolate the problem. If the problem is just at one fixture, then concentrate on that one fixture. If you have low pressure in the entire house, check the supply valve that controls the incoming cold water into the water heater (since cold water throughout the house is not a problem, you can exclude issues dealing with cold water). If that valve is a gate valve, I would focus on that. Gate valves can corrode and the gate can shear off and either partially or completely block the water from passing. This could be the issue if you have low hot water pressure throughout the entire house (or none at all).
If the problem is in a shower, and the valve has a single handle that controls both hot and cold, I would probably replace the cartridge in the valve. This is a common issue, especially with Moen posi-temp shower valves. Replacing the cartridge will fix the problem.
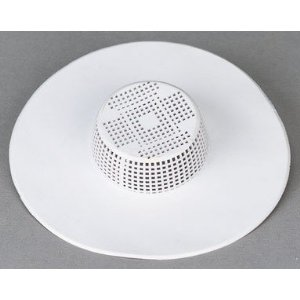 Plumbing drain clogs can be lessened by using a screen across the drain. This might sound somewhat strange, but they are made and are readily available at a home center or a pet store.
The idea of catching hair before it reaches the drain pipe is smart. People with long hair can clog a shower drain with no problem. Giving the dog a bath can do the same. Products like the “hair snare” work well in some situations.
A hair snare type product simply sits on top of the drain opening. You simply open the package and set it over the drain. They have a raised center section that allows room for a pop-up drain, but I don’t like the design. A pop-up in a sink sits too close for the screen to work. You could cut the product to fit, but it would really need to be a perfect cut to catch any hair.
The product would work well in a shower or utility sink (like a garage slop sink) where the drains sit in the center of the basin and the walls won’t interfere with its placement.
Still, since the product has a lip, you will be left with either a small amount of water around the lip of the drain where hair can concentrate.
 With the holiday season comes water heater stress. You get guests in your house and when everyone wants to shower, the water heater works overtime.
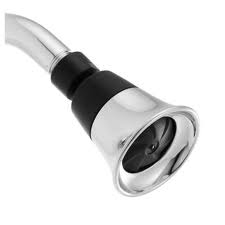
Sure, you could stagger showers with enough time in between for the water heater to catch up and reheat enough water for the next person. Here is a stupid, simple idea that works: use less hot water. Now, I’m not demanding short submariner type showers (although that would work). Nor am I saying you should turn the water off as you are soaping up (yes that would place less stress on your water heater too). I’m suggesting you replace your showerheads.
If you have 2.5 gallon per minute showerheads now, and you replace them with 1.6 gallon heads, you will save nearly 1 gallon of water for every minute you shower. So if you have guests staying at your house you can rack up the savings, and let the water heater breathe a little easier. Let’s assume you have 4 people at the house and each takes a 10 minute shower (probably a conservative estimate). Do the math: 4 people x 10 minutes = 40 minutes of total shower time. Take 40 minutes x .9 gallons (2.5 gallons minus 1.6 gallons) of water savings per minute =36 gallons of water per day that they stay over. Best of all, it will only take you 5 minutes to replace a shower head.
 Since a dog door cut through your wall is an opening into your house, it should be as weatherproof as you can make it. For this reason, I like the store-bought dog doors that have 2 flaps on them. These have a flap on the interior of the wall and the exterior of the wall.
Cutting a hole in your wall is a big deal, and so you want to make sure that the outside actually stays outside. I’ve seen people make their own dog doors, and they really look like they are homemade (remember too that this is a potential entrance point for a burglar).
Store-bought dog doors get assembled in halves. There is a wall kit that you can buy (usually sold as an addition to the dog door) that bridges the gap between the two halves. This kit keeps all of the wall insulation in the wall and makes for a flawless installation. The two halves mate with the wall kit and then you install long screws in each of the corners to hold it all together.
I would suggest running a bead of caulking on the exterior of the dog door where it meets the wall. For a smooth surface wall, like siding, you can get away with a lesser amount of caulking. For rough surfaces, like stucco, use a thick bead of caulking and then wet your finger and push it into the crevices to fill the gaps.