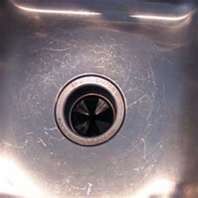
 Stainless steel kitchen sinks are beautiful and appear to be resistant to virtually anything. I like stainless sinks, but they do get scratched. Just think about how often people throw silverware in them, not to mention a heavy griddle. It really doesn’t take much for the sink to get a very visible scratch. Fortunately, the scratch can be removed.
You can buy mild abrasives that will buff the scratch out, but there is a sequence to follow. First off, clean the sink. Use soapy water and a sponge and get rid of any greasy nastiness. Rinse out the sink and dry it with paper towels. Turn on the lights in the kitchen so you can see the scratch and any other blemishes. If you don’t have a light directly over the sink, use a desk lamp or other portable light. You want to light up the area.
Use a commercial product designed for stainless steel sinks along with a 3M Fine Scotch Brite pad. You can try Franke’s or Bar Keepers Friend, but there are several that will work. I know some people that use a mild cleaner and a sponge who like the results. The important thing is to lightly rub with the grain of the sink. If you look closely, you will see which way the finish of the sink runs. Follow this direction or you will have an ugly rub spot that looks like the surface was worn down.
Once you are happy with the appearance, you can wash and dry the sink again.
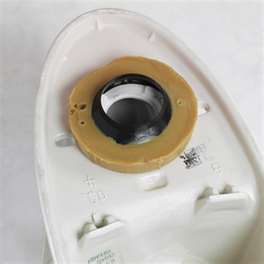 You can certainly install a toilet with multiple wax rings, in fact sometimes it is necessary to make sure you don’t have a leak.
The most common case is when a homeowner will install a tile floor (or really any thick floor). This effectively raises the height of the floor and increases the distance from the toilet flange to the base of the toilet. If you use a regular sized wax ring to fill in this space, it may not be large enough and as the waste is flushed, some of it may end up on your floor.
You can buy an extra-thick wax ring, or you can just buy two rings and stack one on top of the other. I would buy the type that has the rubber insert in it as it directs the waste down the hole.
Once you stack the wax rings, line up the bolt holes and push the toilet down towards the floor. The most important part is that you should feel resistance as the wax rings fill the void between the underside of the bowl to the top of the toilet flange in the floor. If you don’t feel this, it may mean that there is still a gap, which could lead to a leak.
Once you feel the resistance, put your full weight on the toilet until it comes to rest on the floor. Then you can tighten the nuts on the bolts.
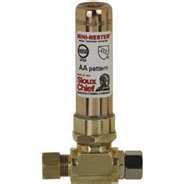 Water hammer at a toilet is common. Water hammer is caused by a sudden shutting off of the water. This causes a shock wave and can lead to loud noises as the shock wave rumbles around until its energy has dissipated. The shock wave is most commonly caused by an electric valve, such as a washing machine or dishwasher, but someone slamming their hand on a faucet handle can cause it too.
With a toilet, the refilling and shutting off of the water can lead to noises, but not necessarily water hammer. In a lot of cases, people who think they have water hammer, only have a toilet fill valve that is going bad. It can vibrate as water passes and then make a loud “thud” as the water is shut off. Another common source of noise can be the angle valve. As water passes through it, you can get some vibration that sounds like a whine. You can certainly replace this and the noise should stop.
If you have true water hammer, you can install a water hammer arrestor near the offending fixture. They attach to the water supply. For a toilet, you would only have one arrestor, but for a washing machine you would have both hot and cold supply locations.
 Homeowners generally don’t consider using a pressure reducer for their drip irrigation system, but they should. Drip irrigation directs water to the root ball of the various plants, which saves water. Instead of spraying water over a wide area, the drippers direct water at the root ball.
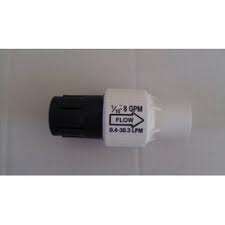
Another big difference between sprinklers and drippers is that drippers don’t use adhesive to hold the system together. Instead, drip systems use black tubing and the fittings are barbed which is enough to hold the system together…unless the pressure is too high. Drip systems generally like pressure at or below 25psi. Your home’s water pressure should be between 40-80psi which is far more than a drip system likes. Consequently, you need to install a pressure reducer.
The order of parts is the water enters and exits the irrigation valve, then the filter, then the reducer, although some systems have a filter/reducer combination.
You can buy reducers at different pressure levels, and some have an adjustable reducing feature.
To connect everything, the filter threads into the valve and the reducer (if it is a separate piece) will either screw onto it. Then you will need a barbed insert and glue it into the output side of the reducer. From there the black poly hose pushes into the barbed insert.
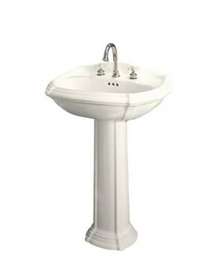 Installing a pedestal sink takes some precautions. They usually come in two pieces, one is the actual sink, and the other is the support base. They have small holes under the sink where you can hold the sink to the lumber in the wall by using screws or bolts and washers. It is recommended that you open the wall and install a piece of lumber as backing. The lumber is secured to the wall studs and covered with a drywall patch. When you push the pedestal sink against the wall, you can screw it to the lumber behind the drywall.
Although it isn’t the preferred way of securing the sink to the wall, you can use adhesive caulking as well. I had a house where the builder used adhesive caulk and it was very solid. The key is to get the sink balanced on the base and against the wall. You can apply a liberal bead of adhesive caulking at the back perimeter of the sink and push it against the wall. You could also use some wall anchors underneath the sink for additional holding power. Also add some adhesive to the area where the sink meets the base. The concern obviously is since the sink juts out from the wall, if someone hit it or if a child decided to do pull-ups on it, it may fall down. That’s why securing the sink into lumber is a safe bet. But truthfully, I’ve had to remove some pedestal sinks from the wall and they are so secure that sometimes the choice is to either pull the drywall off of the wall, or break the sink into pieces.
 So your toilet is leaking between the tank and the bowl and you have tried to turn the bolts but they are rusted shut. What do you do?
The answer is simple: cut them in half. Sometimes it’s just not worth the struggle to wrestle with the bolts and corroded nuts. Cutting them off is fast and relatively easy, but it really depends on how the toilet tank and bowl come together and what your access is to the bolts.
Some toilets have a small gap that you can slide a hacksaw blade into, but others you will only be able to access from underneath. In some cases you will only have access to the nuts as they will be snug against the underside of the bowl. If you don’t have good access to cut the bolt, you can always cut through the nut (or use a nut splitter tool).
A regular hack saw is usually too big to get into the small space. For these tight spaces you can use a close quarter hacksaw. This is basically just a handle that holds the blade from one side leaving half the blade exposed with no support to get in the way. Using this, you can slide the blade into very small spaces.
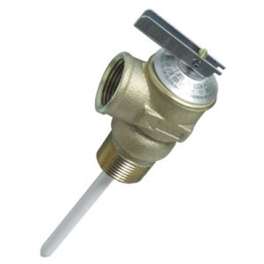 A water heater has a TPR (temperature and pressure relief) valve for safety. This allows the tank to vent excess pressure and heat and is a measure to prevent the tank from exploding. Manufacturers recommend testing the valve periodically by toggling the handle on the valve. The only problem is, sometimes the TPR doesn’t stop dripping after toggling the handle.
You can try a quick fix but it may not work and you may be faced with replacing the valve. Try using a hammer and giving the end of the valve a light “tap”. The tapping may just reseat the valve and your job is done. If the valve still leaks, you are looking at replacing the valve.
It isn’t a difficult job, but you should shut the water off to the water heater and drain it down to just below the level of the valve. The valve may be located at the top or side of the tank. Disconnect the drain line from the valve and then use a wrench to unscrew the valve from the tank.
Wrap the threads of the new valve with Teflon tape and install it back into the tank. Reconnect the drain line and turn the water back on.
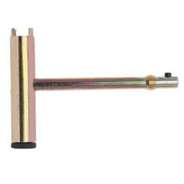 A shower cartridge can get awfully crusty and be very difficult to remove by hand. This is where the cartridge removing tool comes in. It’s like magic.
Moen makes a cartridge pulling tool and Danco has a tool as well. Both work great for removing Moen cartridges.
The first thing to do is to shut off the water and remove the handle. The handle may have a setscrew at the base or the cap may pop off and reveal a screw to remove. Once the handle is out of the way, remove the retaining clip. It has a small tab that you will have to grab and pull outward. Needle nose pliers work great for this. One the retaining clip is removed, you can use the puller.
Each style of cartridge puller operates the same, although the tools look a little different. You will place one end of the tool over the cartridge and screw the threads into the top of the stem. As you are doing this, the ears of the tool will engage the cartridge. The ears fit into 2 slots at the top of the cartridge. With the Danco tool, you rotate the entire tool to free the cartridge. With the Moen tool you rotate a large nut or handle at the rear of the tool. As you turn the tool you will be able to see the cartridge lift out of the opening.
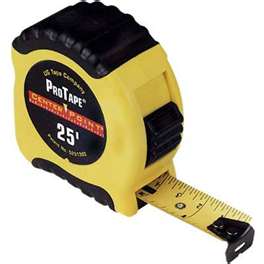 Have you ever noticed that picture hanging never quite seems to end up on the wall where you thought? It is close, but may be off by an inch or so. It is all in how you measure.
If you are like many people, one person will hold a picture on the wall and then move it left or right, and up or down when the other person says to. So finally you have the picture where you want and you make a pencil mark on the wall where the top of the frame is.
If you install a picture hanger at that line, the picture will end up too high. This might not matter, but for people hanging pictures in groups, it definitely matters. The reason for the difference is that the picture wire or fastener is lower than the frame. So the picture will be off by the distance between the wire (or hanger) and the top of the frame.
You can avoid this by simply measuring this distance and compensating for it. If you have a picture wire, hook the tab of the measuring tape under it and pull it taut. Measure the distance to the top of the frame (where you made your mark). Now take this measurement to the wall and lower the mark by this amount. It works the same for hangers as well.
 A garbage disposal ruined the football playoffs for me. I was at a party and during the game someone was making asparagus and decided it would be a good idea to throw the stalks down the garbage disposal…lots of asparagus. Well it didn’t take long for the sink to start backing up. Well, the owner of the house asked me to look at it and I knew exactly what to do…wait until halftime.
Throwing things down the disposal is tricky business. Some items pass and some cause the sink to back up. Grab a bucket and slightly disassemble the fittings enough to where the water from the sink will drain into the bucket. Then you can get to work.
If the sink is backing up only on the disposal side, you know that the clog is isolated to that side. Start taking apart the slip fittings until you find the restrictor pipe. It generally is placed in a horizontal position and carries waste into a pipe in a vertical position. A common place is where the disposal waste pipe joins the trap, but depending on your sink, it may be located elsewhere. It doesn’t matter though, remove pipes until you find it. You will know the right pipe because it will be heavier than the others due to a bunch of asparagus (or whatever went down your sink) sitting in it.
You can tap the pipe against the floor and watch the gobs of stuff come out of it. When it is clear, just reassemble the piping in the same manner that you took it apart.