 Alright landlords, after a tenant moves out of your property, how often do you end up doing some painting? Maybe not a full paint, but at least some touch-up painting. As a handyman, I see it a lot, and I'm talking nearly almost all move-outs.
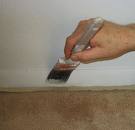
In my experience with landlords smarter than I, the landlord will have us paint the entire interior with the most popular color of white paint, in semi-gloss.
Why the most popular color of white? Because it is likely to be around for a long time, so matching it should be easy. For the last several years, a very popular flavor of white paint has been swiss coffee. All major paint manufacturers have their version of swiss coffee, although it will have a different name.
Why semi-gloss paint? Because it is easy to wipe clean (which saves the landlord money over a re-paint), and it is easier to blend in when you do have to touch it up. Typically builders paint the entire house with flat paint (because it is slightly cheaper), with the exception of the wet areas (kitchen, laundry, bathrooms).
This seems to be a good strategy for not only landlords, but owner-occupied residences as well, particularly if you have small kids.
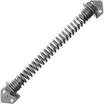 Houses with pools are required to have a self-closing and latching gate. This is accomplished by installing a self-closing gate spring on the gate, so when someone passes through the gate, the spring forces the gate to close and latch. This is an easy job for a handyman and it may not even need to be replaced.
If you don't have a self-closing mechanism on the gate, you certainly have to add one. However, if you have an existing one that has stopped working, you might be able to bring it back to life. At the end of the gate spring you will see a series of holes. These holes are attached to a mechanism that torques the spring to a tension and causes it to self-close. There is a pin, or should be a pin, that holds the mechanism and it's tension in place to keep the spring tensioned and functioning. It is common to see this pin shear off which makes the spring lose its tension, causing the gate to no longer be self-closing.
There is a lot of pressure on this pin which is why it shears off. You can use a large nail as a temporary solution, but the softness of the nail will also cause it to eventually fail. The trick is to find an alternative that fits the hole but is hard enough to stand up to the tension. You can try a quality drill bit. Choose the largest diameter that will fit into the hole. Use a nail to start tensioning the spring. Stick the nail in the hole and move it to tension. Hold the tension in place by inserting the drill bit into the hole. Repeat this until you have enough tension that the gate closes and latches when the gate is held at a 45-degree angle to the wall. There is a fine line here too...don't tension it so tightly that the wall shakes.
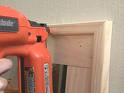 If you are going to be working with real wood grain baseboard or trim you will need to fill holes that you make with nails or brads while securing it to the wall. Nailing the trim to the wall not difficult and can be done by you or your handyman. Use the appropriate finishing nail or brad at the wall studs and countersink the nail head so it lies below the surface of the wood. A pneumatic nailer will do this for you, but you still have the hole to fill in.
The challenge is that wood putty doesn't accept stain like your wood trim does. Wood putty or filler will absorb more stain and turn darker than the surrounding wood. This won't look very nice on the finished piece as you will see exactly where the nail holes are.
If you can, hit the nails into the grain of the wood. The grain tends to accept stain more than the surrounding wood. If the grain lines up with the wall stud, hit it into the grain and fill it with putty. Sand or scrape the putty off so that the filled hole is flush with the surface, and then add stain and varnish. With an open grain like oak, you won't be able to tell where the nail holes are. You can also make your own putty using sawdust from the off cuts mixed with a little wood glue and stain.
 As warm weather approaches and the air conditioners invariably get turned on, it's time to have the handyman head into the attic to stop any air leaks. I see this a lot in the summer when working in the attic...it will be 30-degrees cooler in the attic than it should be due to a leak that puts cool air into the attic rather than in the living space.
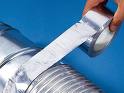
Venture to where your unit is (it may not be in the attic) and turn it on. You will be feeling for cooler air escaping and listening for a hissing or blowing sound. Pay particular attention to areas of transition. Think of your air conditioning system like the human body. Just at the heart pumps blood into larger arteries that branch off into smaller veins and finally capillaries, so does your air conditioner pump cool air into large ducts which finally branch off into smaller ducts going into each room. It is at these transition areas, where the size of the duct changes, that you should focus on. Also pay attention to where the plenum transitions into the ductwork.
When you find an air leak, you can use metal tape (aka foil tape) or a duct sealant. I like the foil tape as it is very sticky and easy to use. Seal any leak that you find by covering the leak with tape or sealant (with the tape you can use the air conditioner immediately). Tape over the leak and push down all edges of the tape.
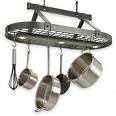 Hanging a pot rack can be easy or tough for any handyman. It all depends on the where the lumber is above you and the configuration of the pot rack. Some pot racks are meaty...thick gauge steel and heavy chains to hang it from. They will hang from several lag bolts to balance their weight.
Most people want the pot rack centered over kitchen island, cooking area, or preparation area. If you have a single story house, this is fine so long as the ceiling joists above the area are located where you need them to be. Much of this job is measuring.
Manufacturers typically spell out the distances for the mounting points of the pot rack You will need to use a stud finder and mark out the locations of the joists. You get a nice surprise if the joist is not where you need it to be. If this is the case, you have a choice of either moving the pot rack over to accommodate the joists, or going into the attic to add some lumber in the aforementioned location.
If your choice is to add lumber, use the same dimension size so that it secures easily to the surrounding joists. Use 16d nails and framing anchors for a rock-solid installation. Once the lumber is in place you can pre-drill the holes for the lag bolts, through the ceiling and into the joists. After the lag bolts are installed it is a matter of hanging the pot rack and balancing it.
 We've all had to deal with broken bulbs. They scare many homeowners to work around as there are sharp pieces of glass and exposed electrical filaments. So how do you remove them? Well, you start off by making sure the electricity is off.
There are many ways to remove it, but basically you have to get the socket to start moving counter-clockwise. On larger bulbs, you may have a thick filament you can grab with pliers and turn, otherwise, most smaller bulbs don't leave much of anything to grab.
I've heard people using half of a potato to push it into the socket and turn it out, but there is something about a wet potato and potential electricity that really bothers this handyman. If you plan on pushing something into the socket to turn it, try crumpling up some newspaper and stuffing it into the socket. The friction should be strong enough to get it started.
I like using needle nose pliers. You can place the pliers inside the socket and open them. That's right...open them. By opening the needle nose pliers, each arm of the pliers will contact opposing sides of the inside of the socket. This should allow you turn unscrew the base of the bulb.
I have also used two small needle nose pliers and actually grabbed 2 opposing sides of the bulb's base. The key is to use 2 very small pliers, and you have to slightly bend the metal bulb base inward to have something to grab onto, without chipping the fixture's socket.
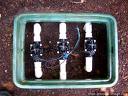 Wiring your electronic sprinkler valves is certainly within the realm of most homeowners. If you don't feel comfortable doing it you can always ask your handyman, but for the most part it is following colors on the wiring and connecting the wires.
Each electronic sprinkler valve will have two wires coming out of the solenoid. One wire will get connected to a white "common" wire and the other wire will get connected to an individual wire connected to the sprinkler timer control box. Each wire coming out of the cable connecting the sprinkler valve manifold to the timer will be a different color.
To wire the timer, just attach an individual wire to each of the station terminals you plan to use. For example, if you have four sprinkler valves, you will strip the ends of 4 wires and attach one to each screw terminal. The white wire is always the common wire and must be attached under the screw terminal marked "common" or "com".
Now go to the sprinkler valve manifold and whichever color is attached to the timer's first station terminal, connect one wire of the sprinkler valve to this color. Strip the insulation from the end and use water proof wire nuts. Do this for each sprinkler valve, attaching only one wire of each valve to each different color wire corresponding to the timer station screw terminals.
Once each sprinkler valve has one wire connected, take the remaining wire of each valve, strip the insulation, gang them together and attach them all to the white common wire coming from the cable, again using a waterproof wire nut. Now you can program the timer to run.
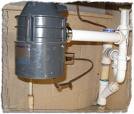 A handyman is frequently called to unjamb a garbage disposal. In that case I generally try to coach a customer through the process rather than visit the house and charge them for a 2 minute job. In those cases where glass breaks and goes down the disposal, there are some tricks to removing the glass before you have to remove the disposal from the sink. Naturally, unplug the disposal to avoid injury.
Try to avoid running the disposal if you know there is glass in there. This will further break the glass which will increase the chances of a small piece of glass becoming lodged in between the grinding plate and the side of the grinding chamber. Instead, use a wet/dry shop vacuum and suck out the broken glass. This should clear most, if not all, of the glass. Alternatively, you can pick out the larger pieces of glass with tongs, and then place the vacuum in to the hole.
Although I have never tried it, I have been told cutting a potato in half and pushing it into the disposal to grab the broken glass is effective if you don't have a shopvac.
If the disposal is jammed with broken glass, you can try freeing it up by using an allen wrench or the unjambing tool that came with the disposal. Stick the tool in the bottom of the disposal (underneath where the cord enters the housing) and rotating it back-and-forth. You might find this frees it up temporarily until the loose glass jambs it up again.
As a last resort, remove the disposal form the underside of the sink. You will have to remove the discharge piping and then loosen the collar with a screwdriver. Turn the disposal upside down so that the opening of the disposal is resting on the floor. Use the allen wrench or unjambing tool to try to get the blades to move. With luck, the blades will move enough to allow the small glass fragments to fall out. With the disposal still sealed to the floor, briefly plug the disposal into an outlet to guarantee that it is clear. Be careful on this one. Even though the glass should be contained, it is a good idea to wear safety glasses and take the proper precautions. When it spins freely, re-secure the disposal to the sink.
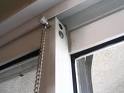 Many of us have sliding glass doors, and maybe the handle lock has stopped working. Many homeowners will wedge a broomstick or some other piece of wood behind the slider to prohibit it from opening. Well if you are tired of looking at the broomstick, read on. There are many mechanisms to lock your sliding glass door.
Aside from repairing or replacing your handle lock, you can install a locking mechanism at the base of your sliding door. There are many choices here, but it seems the two most popular are a pin lock or a charley-bar type lock.
A pin lock looks like a long nail that you install in a hole you will have to drill through the frame and track. Basically you will close the door and drill a hole large enough for the pin to slide into. If someone tries to open the door, the pin will stop the door from moving.
A charley bar works the same as a broomstick, but it looks a little nicer. It is a hinged metal bar that telescopes out to snug against the back of the sliding glass door. Here you mount the mechanism to the opposite inside jamb. The bar will swing downward and rest in a bracket you will secure to the back of the sliding door.
Either style of lock works fine and you probably won't need a handyman to install them for you.
There are many styles of sliding glass door locks and they are actually very similar. Each will secure to either the door or the track and have a means to stop the door from traveling.
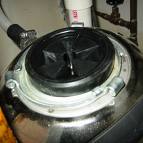 Look into your kitchen sink down at the garbage disposal. You should see a black folded rubbery thing with a hole in the middle of it. This is called a splash guard and allows it so that you can push food down into the garbage disposal, but keeps flying food from exiting the disposal grinding chamber. I know I'm guilty of scraping food off my plate into the sink and, after it piles up in the sink, pushing it into the disposal for grinding. Most people push the scraps on down with whatever is in their hand...a fork, knife, or spoon. Well if you fork or knife is pointed in such a way that it contacts the splash guard, it will tear.
Replacing a splash guard is done frequently by this handyman, but the job is easily performed by the average homeowner.
Unplug the disposal to stop the flow of power to the unit, even though the switch if in the off position. The disposal will need to be lowered from the sink bottom by at least a few inches to free the splash guard, as it is sandwiched between the top of the disposal and the underside of the sink. You will need to relieve the tension at the discharge pipe at the side of the disposal, so either remove the pipe via the two screws at the side of the disposal, or remove the other end of the piping further down the drain via the slipnuts. I use a small screwdriver to loosen the mounting collar at the top of the disposal.
Once the collar is loose, I place my knee under the disposal to set it on for the few seconds it will take to remove the old splash guard and place the new one on top of it.
After you have the new guard on, just tighten the collar and reinstall the discharge pipe.