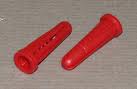
 Sometimes when you are looking to hang something on the wall, there isn't a wall stud where you need it to be. A Las Vegas handyman deals with these types of issues all the time. I personally don't like plastic hollow wall anchors. These are plastic cone-shaped inserts that do into the wall to hold a screw. These are geared more for small screws with small threads.
You've probably bought products that get secured to the drywall that come with these hollow wall anchors. These anchors get tapped into the drywall. Once the anchor is imbedded into the drywall, you can install the screw which tightens into the hole at the center of the anchor. There are good and bad with these anchors.
The good point of these anchors is that they are easy and convenient. However, I dislike them for any kind of holding power. Since they are plastic, you can't fully tighten the screw in the anchor. If the item you are hanging has any kind of weight to it, it could pull the screw out of the anchor.
There are certainly stronger, more reliable anchors to use such as molly bolts (aka butterfly bolts), and EZ anchors. They will hold considerable weight and are easy to install into the drywall.
Replacing an exterior hose faucet is a low stress job for a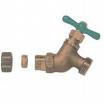 handyman. There are only a couple reasons you might replace the valve...it's damaged and unrepairable, or it's just plain easier to replace the faucet than repair it. A new hose faucet is only going to set you back a few dollars anyway.
The hose faucet will secure to the pipe by either a threaded fitting or a compression fitting. A hose bib attached via a threaded fitting simply unscrews from the fitting. The fitting is soldered onto the pipe with a torch. Simply unscrew the hose faucet while holding the fitting stationary (so as not to twist the pipe). Wrap the threads with teflon tape (a minimum of three times), and screw the new hose faucet back on.
For a compression fitting, you can hold onto the compression nut behind the hose faucet and unscrew the hose faucet. Rather than replace the compression nut and ferrule, I just leave them on the bare pipe and secure the new faucet to them. Teflon tape on this is not necessary.
When you are done, install an anti-siphon mechanism at the end of the faucet. You can just screw it on and secure it with the small screw.
 If you have a large handyman extension ladder, when you are not using it (which is most of the time), where to you put it? If you set it on the garage floor, it takes up too much space, someone could trip over it, or you could hit it as you are pulling the car in and out of the garage. It seems the best place to store a large ladder is off of the ground. You can choose to either hang it from a wall or a ceiling.
You can buy an assortment of organizers for your garage, but an extension ladder, particularly a fiberglass extension ladder, is heavy. I would use heavy duty ladder hooks.
You can buy these at most home centers. One end of the hook looks like a large lag bolt and the other end is a hook shape that is typically covered in a protective plastic sleeve. It is a matter of pre-drilling a hole in the wall studs (or ceiling joists) to hang the ladder.
Unless you have very tall ceilings, you can't hang a large ladder vertically. So use a level and mark points on the wall (or the ceiling) for the hooks. You will need at least 2 hooks and maybe three depending on the size and weight. Once you have the weight evenly distributed along the distance, mark the locations of the studs (or joists) and drill a pilot hole slightly smaller in diameter than the lag bolt end. Screw the hooks into the lumber and hang up the ladder.
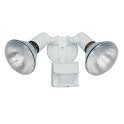 Many homeowners are looking for a little extra security, especially at night. One of the easiest ways is to light up the area. Having a handyman install some landscape lights around the perimeter of the property will help light up someone entering the boundary of the property. Installing some motion detector lights in place of a coach light at a door will illuminate points of entry at the house. The easiest way to accomplish this is to simply replace existing lights with motion detection light fixtures.
Motion detector light fixtures are installed like any light fixture, with the exception that you will have some adjusting to do. Here are some details on replacing a light fixture. Basically, you will remove the old fixture and connect the black hot wire to the black fixture wire, the white neutral wire to the white fixture wire, and the green or bare copper ground wire to the ground terminal in the fixture. Use wire nuts for tight connections. Then attach the fixture to the wall.
Adjusting the motion detector light fixture is not complicated. It's probably best done at night so you can test it and get a feeling for it's sensitivity. First, aim the bulbs in the direction where to want the light cast. Next you will need to aim the motion sensor for height and distance, as well as how sensitive you want it. You won't want the lights to turn on, for example, if the trees across the street are blowing in the wind. Adjusting it is a matter of making incremental changes and then testing them as if you were approaching the house. Finally, you can choose to leave the lights on for a few seconds or a few minutes after the sensor detects movement.
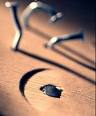 So you're hammering away and the nail bends...or worse, breaks off. If you are like many the handyman, you try to tap the bent nail upwards so it is straight again. Well, when everything else fails, you have to remove it without damaging the work surface.
The least invasive method is the claw hammer. Be careful to place something, like a piece of wood, under the hammer to protect the work surface from damage. Stick the nail shank into the claw and pull back. If you can't get it to budge, try moving the hammer to the side. This will bend the nail shank, but it may get the nail to move outward...repeat this over and over until the nail pulls out. As a last resort, and only if you don't care about the work surface, try using a cat's claw. This is a small claw that gets hammered into the wood to grab the nail shank. It will chop a hole in your work surface, so only use it if you have to.
If you are still scratching your head or if the nail breaks, try grabbing it with pliers and applying leverage. Instead of pulling the nail straight out, roll the pliers back to pull the shank out at an angle. If that doesn't work, try hammering the nail through to the other side of the work surface. You will have a blemish to fill in, but you can start over with a fresh, straight nail...that is until you bend that one too.
That's right, my ANNUAL power bill. I've been a convert for 2 years now, and I never thought I would say this without feeling like trailer trash, but I love my swamp cooler. Before you get visions of me in a trailer, let me tell you that I was converted by some neighbors. I'm lucky to live in a nice neighborhood with many of my neighbors being self-employed or professionals. Yes, they use swamp coolers too. If it makes you feel better, you may call them evaporative coolers.
As a Las Vegas handyman, I am both blessed and cursed to live in a hot, dry summer climate. This combination of dry heat is perfect for a swamp cooler. For those of us that live in a desert climate, we tend to use the bulk of our annual power during the summer months. So naturally, the summer is target-rich for cutting your power bills.
My power consumption went down so dramatically that the power company paid me an unannounced visit on a holiday Saturday to snoop around and make sure I wasn‘t stealing power from them. I'm not sure if they love me now or hate me.
So, I've established that a swamp cooler will save you money over a traditional air conditioning system, but I will be the first to say that a swamp cooler is not for everyone. It's not the type of thing you plug in and forget about. You will need to replace the cooling pads and keep an eye on it and the weather. Humidity is the arch-nemesis of the swamp cooler, but if the air is dry outside you might want to keep the winter coat handy.
A well-tuned swamp cooler should be able to drop the temperature by 30 degrees, so if it is 100 degrees outside, look for inside temps of 70 degrees.
The biggest challenge for a homeowner is where to install a swamp cooler. Ideally, install it on the north side of the house (where it's shady) through a window that raises up-and-down. If you have to install it where the sun will hit it, arrange something to cast shade upon it. If the sun hits the unit, it will warm the air by a few degrees, which is very important. I like a side-draft unit installed through a ground floor window, but you can certainly cut a hole in your wall to accommodate it. Of course, you need to take precautions so that security in maintained with window locks, etc. should you choose to place it in a window.
Using a swamp cooler takes a different mindset too. Basically, you are pressurizing the house like a balloon. You must exhaust the air so that you get airflow. This is accomplished by slightly opening some windows or by using up-ducts (trademarked as "Up-Dux"), which ventilate air into the attic. You can plan on venting 1-2 square feet of space for every 1000 cfm (cubic feet per minute) of air the swamp cooler produces. If you don't want airflow in a particular room, don't ventilate air in that room (i.e don't open the window or install an up-duct). To determine how much cfm you will need, take the volume of air in your house and divide that number by 2. For example, if you have a 1,400 square foot house with 8 foot ceilings, you would need 5,600 cfm of swamp cooler output (1,400 x 8=11,200. 11,200 /2=5,600).
After I install a swamp cooler, I will level it and fill in any gaps with weatherstripping. If you have a side-closing window you will need to fill in the top portion with a material that makes you comfortable...many people use plywood although this isn't very attractive. I let the unit run and check the wetness of the pads. If the pads are not uniformly wet, you are allowing hot incoming air to mix with the cooler air that the unit has produced, which will raise the temperature of the air entering the home. Every degree counts. If there is a dry area on the pad, I will recheck for level, and if necessary drill more holes in the water supply trough that feeds the pads.
At some point you will have to perform maintenance on the unit. Here is some information on how to replace a swamp cooler pump and how to replace a swamp cooler motor.
There are certainly times during the summer that I have to shut off the swamp cooler and turn on the traditional air conditioning. This lasts for about 3 weeks, from late July to early August, and is due to the "monsoon season" and the high humidity levels.
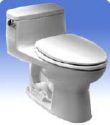 Alright, we've all heard about self-closing toilet seats. As a handyman, I have to say I didn't realize how adept the toilet seat industry has become in marketing their products. They are cutting-edge marketing geniuses.
In a quick web search, I came across many terms used to describe self-closing toilet seats and the reasons we all should own one. Here are the very latest buzzwords in toilet seat technology. They are branded as: whisper-close, soft-close, self-close, quiet-close, and slow-close and can resist everything including a nuclear blast. In fact, in the event of a nuclear blast, I'll bet the only things left on the planet will be cockroaches and this special toilet seat technology.
According to these marketers, these toilet seats:
Prevent Injuries: I started shaking my head at this one, but then again this technology would have prevented my little brother from chipping his tooth when he was in potty training (don't ask).
Keep Pets Out: I guess this is good, unless you are training your cat to use the toilet by straddling the seat.
Eliminate Noise: I get this one. Nobody likes a slamming toilet lid in the middle of the night.
Increase Hygiene: Have you ever dropped your keys or phone in the bowl?
They even incorporate QRF (Quick-Release Functionality). I'm guessing this is for easy cleaning.
Doesn't it make you just want to race out to get one? If you are so inclined, here is how to install a toilet seat.
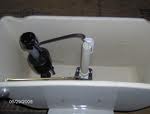 That tiny trickle from a toilet can be frustrating for a handyman or a homeowner. It wastes water just as a bigger leak does, and can interrupt your sleep when the toilet starts to fill for no apparent reason. That's a dead giveaway that water is leaking from the tank.
There are many possible explanations for the leak, but let's start with the easy ones. Begin by making sure the float is set at a level that won't allow water to run into the overflow pipe. If the water in the tank is running into this pipe (it's the one in the center of the tank about the diameter of a quarter), then simply adjust the float level downward so that the water shuts off earlier.
The problem is usually with the flapper or flush valve assembly. The flush valve (a.k.a. Douglas valve) is what the flapper sits on. It is located in the center of the tank and has the overflow pipe rising out of it. Stick you arm into the tank (don't worry, the water is clean) and push down on the flapper. If the water stops trickling into the bowl, you have found your problem.
Even though you replaced the flapper, it may not fit correctly, or there may be damage to the rim sealed by the flapper. Try feeling around the rim of the flush valve for divots, cracks or deposits. You can either replace the flush valve, or you can try a product called a "flush fixer".
If pushing down on the flapper doesn't help, you probably need to replace the flush valve or you may have a cracked tank.
The flush fixer is a hinged flapper/seat assembly that sits on top of the flush valve, exactly where the old flapper went. What makes this work is that on the bottom of the unit is a jelly-like substance that seals against the damaged seat of the flush valve. So, the jelly will fill in the areas and prevent leakage at the points where water got between the flapper and the damaged seat.
Replacing the flush valve is a chore, as it involves removing the tank from the bowl. So, you will need to turn off the water to the toilet, disconnect the supply line to the fill valve, and drain the water from the tank. Remove the tank from the bowl by unbolting it from underneath (you may have to hold a screwdriver on the bolt to keep it from turning as you remove the nut). Gently lift the tank and set it on its side.
Next, remove the spongy-looking spud gasket buy pulling it off, and then use either water pump pliers or a spud wrench to remove the lock nut (this holds the flush valve in place). If you pull the refill tube from the overflow pipe, the flush valve will lift out.
To install the new flush valve, push the tapered washer onto the end of the threads and seat it so that the tapered end faces the threaded end. Shove the new valve into the hole and screw on the new locknut one-quarter turn past hand tight. Push the new spud gasket on and you are ready to re-install the tank.
Before you do, however, check the bolts that hold the tank to the bowl. While you have the tank off, it's a good idea to replace these bolts. In most cases, removing the tank will disturb them enough to get them to leak. It's a simple matter of pushing a washer on the end and tightening it to the tank.
Pick up the tank and gently set it back onto the bowl so that all of the holes line up. Install a brass washer and a nut onto the end of each bolt and tighten them. Be very careful here-if you overtighten these bolts, it will crack the toilet. Once the tank is secured to the bowl, reconnect the refill tube to the top of the overflow pipe and then hook up the water supply back to the fill valve. This should give you years of leak-free operation.
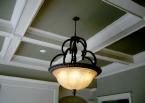 It used to be that when you bought a house, there was a plastic cover over the pre-wired location for the light fixture. Boy, have times changed. As a Las Vegas handyman, now we find dangling wires coming out of the ceiling where the light fixture was, since the previous owner removed the fixture when the bank forced him out during the foreclosure process. Regardless of a ceiling cover or not, the new light fixture installs like it always has. By the way, it's a good idea to test the wires to make sure they aren't live while you are working on them.
You will find three wires coming out of the ceiling, a black hot wire, a white neutral wire, and a green wire (or bare copper wire) for ground. You might also see a red wire. If you do, you can install a ceiling fan and have separate switches to run both the fan and light independently. If you won't be using the red wire, screw a wire nut on it and neatly tuck it into the junction box.
Typically the light fixture will have mounting holes in it where it gets secured to the junction box in the ceiling. Loosen the screws in the junction box until they stand proud by ½ inch. Then you can place the fixture over the screws, turn it slightly and tighten the screws down to hold it in place. On some fixtures, you will wire it first and then secure it to the ceiling, but this is challenging trying to hold the fixture will connecting the wires.
To connect the wires, simply hold the black hot wire to the black fixture wire and screw on a wire nut. Do the same for the white neutral wires, and finally the ground wires. Then just install the bulbs and glass globe.
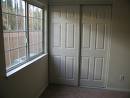 Many homes have sliding doors in closets, or a laundry room. These are commonly called bypass doors and it's something a handyman consistently works on. The doors will either slide along a track secured to the floor, or will hang from a header and ride in a track from above.
On the doors that hang from above, there is a divider mounted to the floor that keeps the doors separated and prevents the doors from swinging in-and-out. We see this commonly when homeowners will have the flooring changed, such a having the carpet replaced, and the installers won't re-install the divider. That leaves the doors to swing in-and-out, and the divider piece disappears.
You can buy a new divider and install it simply enough. If there is so much space between the top of the plastic divider and the bottom of the door (making it so the divider won't even touch the doors), you will have to use a spacer installed underneath the divider. Some dividers come with plastic spacers, but in some cases you may have to fabricate something that is functional and attractive. You can screw the divider into the floor to hold it in place. For carpet laid on top of the slab, you will have to screw the divider into the slab with a small anchor or tapcon screw.