 Drywall repair and drywall texture can be very frustrating. Sometimes you get a good patch, but the texture just doesn't match. Or maybe the texture looks good, but the underlying patch was poor and noticeable. Homeownership is full of these challenges.
My career of blending in damaged surfaces started when I was about 10 years old. In one of his fits of unprovoked rage, my brother chased me up the stairs with my sister's baton.
Well, I narrowly escaped by hurling myself into my room and locking the door. My brother dug in and -- reminiscent of a major leaguer -- put the baton through the cheap hollow door. My parents were due home shortly and we knew we would be in big trouble if they saw the hole.
I stuffed the hole full of newspaper and slid a piece of cardboard inside to hold it all together. A couple of pieces of masking tape finished the primitive patch. Fortunately, the color of the tape matched the door.
It was 10 years before my parents realized that the door was damaged. By that time the statute of limitations had expired and my brother and I had a good laugh. The point is that even if the patch job is excellent, you will likely notice it because you know where it is. Someone walking through the house would probably not.
I doubt there is a home repair person around that has not wrestled with the challenge of matching texture. Short of reshooting the entire wall, you will have to experiment with different techniques and mixtures to get the right look.
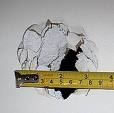
You first want to make sure your wall patch is dry and then sand it. Use fine sandpaper and a sanding block to level the patch. Use a swirling motion with your hand to get rid of the high spots.
You're going to see a flat patch in the middle of the textured wall. Before you start texturing the patch, feather the patch into the surrounding texture. Use warm water and either a sponge or a soft-bristled toothbrush. Dip the sponge or toothbrush into the warm water and swirl the border of the patch away (if you use a sponge, wring it out first). You want to erase the outline of the patch.
There are two main types of texture: orange peel and knockdown. Orange peel uses a thinner material, higher pressure and a smaller orifice than knockdown, which is leveled with a wide trowel to create larger flat areas. Between these options, you can get a lot of variety in the finished look.
You can buy spray texture in a can that does a pretty decent job. It sells for about $12 and claims it will cover up to 100 square feet, depending on the splatter size. For this option, I recommend the Homax brand. It comes with three straws of varying diameter to shoot different sized splatters. It's also oil-based and will dry in about 30 minutes. The downside is that it stinks and will stain carpet and clothing, so cover everything up.
You can adjust the nozzle pressure by changing the temperature of the can. If the pressure is too low, stick the can in warm water for a few minutes. If the pressure is too high, stick it in cool water.
Practice on a piece of cardboard first. You want to hold the can 1 or 2 feet from the surface and use a quick sweeping motion. Don't hold the button down for too long.
If you have knockdown texture, instead of using a trowel to flatten the texture while it is drying, wait until it has completely dried and use fine sandpaper on a sanding block to flatten it. You will have more control.
You can also try to match the texture using a sponge. Choose one that has various sized holes. Use a flat pan (like a pie pan) and mix some joint compound with water. The mixture shouldn't be too soupy or too thick. Practice on scrap before you move to the wall.
Get the sponge damp and push it gently into the mixture. Touch the wall with it and pull it off. Peeling the sponge off will give a different look. You will be left with little spikes that you will have to knockdown.
Along the same lines is to mix up some joint compound and water and use a turkey baster. This technique is good for small patches. Just don't load up the baster so much that it just squirts a big blob on the wall. The tip should have a space so that as you squeeze the baster, the rushing air picks up the texture and throws it on the wall.
Probably the most important part of the job is the paint. You can make most patches go away by repainting the entire wall and not just the patch.
 Being a Las Vegas handyman isn't easy. Handymen are asked to do a wide variety of jobs, some of which they can do, and some they can't. What homeowners need to consider is if a handyman in Las Vegas should be doing some of the jobs they ask.
Many handyman services are simply people that are currently out of work from their normal professions. They are waiting out the storm until the economy improves to the point they can go back to their normal jobs. Consumers should be very careful. Many of these "companies" are 1 man shops that are not properly licensed or insured. They work (and sometimes live) out of the back of their pick-up trucks. If they fall off of a ladder at your home, your homeowner's insurance gets to pay the bill when they file a lawsuit against you. Many of them will say they are licensed, but in reality it is only a business license. Anyone with $25.00 and an ink pen can get a business license.
It is safest to use a professional company with a State contractors license. They are held to a higher standard than an unlicensed company.
Just because someone places an advertisement in the yellow pages doesn't make them legal or qualified to do the job. Additionally, approximately half of those yellow page ads have phone numbers that have been disconnected.
I am very aware of the current economic climate and the fact that consumers really don't want to spend money if they don't have to. But really, a roofing repair should be completed by a licensed roofing company. The economy has found some contractors doing work that is out of their normal scope, because their trade has slowed way down.
Some good advice is to use professional companies that have been referred to you. Friends and neighbors are usually a great source of quality, price, and service.
Pro Handyman is a licensed State contractor, insured and bonded. We have been in business for over 10 years and perform a variety of repairs and improvements for both residential and commercial. Popular jobs we help customers with are plumbing, including water heaters, toilets, faucets, disposals, and sinks, as well as doors, drywall, and much more.
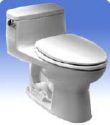
A clogged toilet is very common. When someone asks about this, I usually ask if they have small kids. I don't know what the fascination is, but kids love to throw stuff in the toilet and watch it swirl down the bowl. They only stop after they have been caught, but by then any item that can fit into the toilet has been flushed, and the damage has been done.
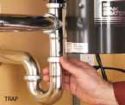
A toilet is a unique plumbing fixture because the trap is built into the toilet and not into the drain pipe (if you look under your sink, you will see the trap in the drain pipe). The water in the bowl seals out the sewer gasses from entering the room, as well as provides a medium for the waste.
I have never used chemicals to clear a toilet. They take too long to work and typically are made to work on hair and grease. You have a couple of different choices. You can use a plunger, a closet auger or hydrostatic pressure.
Hydrostatic pressure is a fancy way of saying that you are going to force water down the bowl. This works fairly well if the water level in the bowl is low. Simply take a bucket (a five-gallon bucket is good), and fill it about half full. Hold it waist high and pour it into the opening at the base of the toilet bowl. The pressure of the water entering the trap from a height may solve the problem. If the water level in the bowl is normal or even high, go right to the plunger.
My tool of choice is the plunger. Use a toilet plunger that seals well against the toilet (don't use a plunger that looks like a cereal bowl turned upside down).
The best plungers can move a large volume of water quickly. These are bell-shaped with a narrow opening on the bottom. The trick with a toilet plunger is to get rid of the air in the plunger and replace it with water. Air will compress but water will not.
Place the plunger into the bowl and under the water at an angle and gently compress it to expel the air. When the plunger expands again, it will fill with water. Now stick it into the opening and with a quick motion, jam the water in the plunger down the hole. Keep the plunger sealed against the opening and gently let it refill with water, then jam it down again.
There are different methods of plunging. Some people move the plunger in and out quickly, but I have found more success in dislodging the obstruction with this method. Try a couple of test flushes to see if you can call it quits. If it still backs up, move to the closet auger.
A closet auger (aka toilet snake) is a short plumbing snake with a rubber boot on it to prevent scratching the porcelain. It has a corkscrew-shaped end that grabs the obstruction or sometimes pushes it through.
Have a bucket or bag nearby to place the wet snake (or plunger) into when you are done. Place the snake into the hole and push as you turn the handle clockwise. You will have to negotiate the bend in the trap, so you may think you have snagged the blockage, but in reality the corkscrew will just be pushing around the trap. When you snag the obstruction, continue turning as you pull it out.
There are times when all your efforts will result in no pay dirt. You will need to remove the toilet and snake it from the base (For removing and replacing a toilet, click here). Gently set the toilet on its side.
You could try to reach into the trap and pull out the blockage, but your hand may not get far enough (obviously, wear rubber gloves for this one). If you can't clear it with your hand, push the snake into the trap from under the base of the toilet bowl.
When the corkscrew makes its way into the bowl, tie an old rag onto it and pull it back through. With any luck, the rag will pull the obstruction out with it. This is a good way to remove things such as toys, pens, combs and various feminine products.
Until someone invents a child-proof toilet, this is a challenge that will be here for a long time. But then again, potty-training would be awfully tough.

Even with a patio cover to keep the sun at bay, it's still hot out there. Have you ever thought of a misting sytem installation? A misting system can cool things down by as much as 20 degrees.
There are two types of systems available, both of which can be found at a home center. Expect to pay anywhere from $40 to $200 depending upon how many linear feet you'll need.
The first and least expensive system is made up of half-inch PVC pipe with nozzles that are built into half-inch couplings that glue onto the piping. All you need to do is buy the number of nozzles needed, some fittings to attach it to the water supply, glue it all together then hang it from the patio cover. This system is unsightly, though, because it's bulky and the glue can run down the piping if you're not careful.
The other system uses three-eighths inch flexible hose, and no glue. This kit's base cost is around $40 and is enough to cover about 12 linear feet of mist area. All of the necessary fittings are included. Although more expensive than the other system, the nozzles are brass and the hose is easy to maneuver. It is also less noticeable than the PVC pipe. In addition, you can add more lengths of tubing and nozzles to your heart's content.
Regardless of which system you choose, the first step in its assembly is to connect the water feed line to the water source. Usually, the hose spigot is handy. If you're using PVC, you'll need to purchase a fitting and a valve to tie into the water supply (This usually involves sweating the fitting on.). For the hose system, just slip the brass hose adapter (It's also included in the kit.) onto the end and screw it onto the spigot. At this point, turn the water on and blow out any debris in the hose.
If your patio cover is made of wood, use the hanging clamps that come in the kit because they have nails that will hold the hose securely to the wood. If your patio cover is made of aluminum, don't use these clamps. Instead, use plastic cable clamps (about $2 for a pack of 20). Use five-eighths inch self-tapping screws to hold them in place.
Now you're ready to bring the hose up the wall, just to the underside of the patio cover. You'll have to decide if you want to mount the nozzles on the inside, the underside or the outside of the patio cover. (If you mount them on the outside, they won't be visible, but your ability to direct the mist may be impeded.)
If you're mounting the nozzles between 8-feet and 10-feet high, space them 24 inches apart and at least 24 inches from the house.
For the PVC system, you'll need to prime and glue the fittings together. For the hose system, just push the hose into the nozzle and twist. Pull out on the outer ring of the nozzle to lock in the hose. Secure each nozzle by attaching a clamp three inches from either side of the nozzle.
To change the direction of the mist line, use 90-degree elbows and tee fittings. The brass fittings for the hose system cost about $5 each. For the PVC, the fittings are about 50 cents each.
Cut the PVC with a PVC pipe cutting tool (about $12); it makes a perfectly smooth cut. I would discourage you from using a hacksaw, because the burrs left on the end of the pipe may clog the nozzles. You can also use the pipe cutting tool or a sharp utility knife to cut the tubing on the other system.
Follow the perimeter of the patio cover until you've reached the end of the mist line, where you will cap it. Before capping, however, turn on the water to blow out any debris in the line.
On the PVC system, glue on a half-inch cap. On the hose system, insert the brass end-plug, which also is included in the kit.
Slowly turn on the water -- it doesn't take much pressure. There shouldn't be any leaks in the PVC system. If there's a leak in the hose system, disconnect the fitting in question and make sure the rubber O-ring is in place.
It's normal to get a slow drip as the nozzle is misting. However, if the nozzle is dripping and not misting, it's clogged. Disassemble it and clean it out.
All of the nozzles will need periodic maintenance. You can use liquid nozzle cleaner to dissolve mineral deposits, or you can replace the nozzles.
I'll bet you'll enjoy your misters so much that you'll want to move indoor activities outdoors. Just don't shower under them -- at least not in front of the neighbors.

Manufacturers claim that programmable thermostats can cut energy costs by as much as 35 percent. I don't know how this applies to where I live in Southern Nevada, but it will help lower costs if it's programmed correctly.
Different people have different theories about using an air conditioner. My brother, for instance, turns the thermostat completely off while he's at work. When he returns home, he's greeted by a blast of 95-degree air, and turns the thermostat back on. I'm sure the air conditioner runs nonstop until the wee hours of the morning to bring the temperature back down.
Other people set their thermostat and leave it alone. However, cooling your house for an entire day while you're away doesn't seem like a good idea either.
A programmable thermostat splits the difference. You program it to cool the air to your comfort when you're at home, and then when you leave for work, it will adjust to a slightly higher temperature setting.
Programmable thermostats range from around $25 to about $100 at a home center, and the thermostat installation takes only about 30 minutes. Saving money doesn't get any easier.
If you have a heat pump, a home center likely won't carry the proper thermostat for your system. You'll need to try a specialty wholesaler.
To install the thermostat, turn off the power to the air conditioning and heating system at the main panel. Remove the cover from the old thermostat.
There are a couple of screws that hold the thermostat body to the wall. Remove these screws and gently pull the thermostat away from the wall.
Depending upon your system, there will be several wires coming from the wall that are attached to various terminals on the thermostat. As you carefully unscrew the wires from each terminal, label the wire with masking tape to identify the terminal to which it was attached. Each terminal has a letter next to it, so write that letter on the masking tape that you attach to each wire. Don't worry, we're only talking about three to five wires.
I also recommend taping wires to the wall, because fishing them out of the wall will really make you sweat.
Thread the wires through the opening of the new thermostat and mount the thermostat to the wall with the screws provided.
Following the manufacturer's instructions, connect the wires to the terminals on the new thermostat. Install the batteries and snap the thermostat's housing onto the base. All that's left is to turn the power back on and program the unit.
I've spoken with several professionals, ranging from air-conditioning contractors to a Nevada Power representative, about the most efficient way to program a thermostat. The consensus is to set it two to four degrees higher when you're not at home than what you set it for while you're at home. For example, if you prefer the temperature to be 78 degrees when you're at home, program the thermostat to turn on the air conditioner when the temperature reaches 80 to 82 degrees. Personally, I raise my ideal temperature by four degrees when I am gone.
You can also raise the temperature inside the house slightly and use ceiling fans.
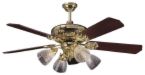
The days of summer bring with it lemonade, sweltering heat, and high power bills. A ceiling fan installation is easy, the fan is cheap to operate, and can certainly help you feel cooler.
Ceiling fans range in price from about $50 to several hundred dollars and take a little over an hour to install. Most of this time is spent assembling the fan after taking it out of the box.
If your home has been prewired for a ceiling fan, the builder should have installed a metal box with a brace bar between the ceiling joists to support the weight of the fan. If you were replacing a light fixture with a ceiling fan, which is heavier than a typical light fixture, you would need to install a brace bar so the fan won't fall.
Once you buy the fan, follow the manufacturer's assembly instructions. With some fans, you attach the blades to the motor housing and then hang the completed fan (in which case you have to be a contortionist), while with others, you secure the motor to the ceiling first and then attach the blades.
Either way, start by turning off the breaker in the main service panel, then test the wires to make sure the power is off.
All fans have a mounting bracket that attaches to the electrical box in the ceiling. Check that this bracket, which is secured with two screws, is tight to the box and the ceiling or else the fan will wobble when in use. The bracket should have a hook or a slot to support the weight of the fan while you make the electrical connections.
There should be two electrical switches on the wall for the fan. One controls the fan, while the other controls the light kit attached to it. The function of the switches depends on how you wire the fan.
With the fan supported by the mounting bracket, pull out the wires from the ceiling. You'll see a white wire (the neutral), a black wire and a red wire (the hot circuits), and a green or bare copper wire (the ground).
Separate the wires coming from the fan. There will be a black wire, a green wire, a white wire and a blue wire. Connect the green wire coming from the fan to the green or bare copper wire in the ceiling. Next, connect the white wires together, then the black wires. Finally, connect the red circuit wire to the blue fan wire (this connection runs the light kit). Use wire nuts (about $2 for a bag of 25) to make tight connections.
Now, you're ready to attach the fan to the ceiling. This can be tricky because you may have to support the fan with one hand while screwing the housing to the mounting bracket with the other.
Lastly, connect the light kit to the bottom of the fan. Remove the small cover from the bottom of the fan and pull out the connection, which is a plastic fitting with wires coming from it that simply pushes into the mating fitting in the light kit. If your fan has individual wires instead of this fitting, connect the individual wires from the fan to the wires in the light kit. Again, match the colors of the wires.
For homeowners who want to install a fan in place of a ceiling light, a brace bar will need to be installed to support the weight of the fan, as I previously mentioned. Unfortunately, there will be only one switch on the wall to control power to the fan. In the past, if you wanted to operate the fan and the light individually, you would have to use the pull chain on the fan or pay for running an additional switch down the wall.
Nowadays, you can install a remote switch, which costs about $25 and is battery operated. This unit hides inside the fan's mounting bracket (you'll never see it), and the switch can be fastened to the wall or stored like a TV remote. It takes just a few minutes to make the electrical connections, and instructions are included. The downside is that when the battery wears out, you'll have to remove the fan's cover to replace it.
Once the fan is wired and secured to the mounting bracket, turn the breaker back on and flip the wall switches.
If the fan still wobbles, the blades are out of balance. This can be fixed with a fan balancing kit (about $2), which includes a clip that you'll attach to the end of each blade. Turn on the fan after moving the clip from one blade to the next. After deciding which blade makes the greatest difference in minimizing the wobble, move the clip down the length of the blade to determine where to place the permanent weight. This weight sticks to the top of the blade and can't be seen. The kit includes additional weights in case more than one blade is out of balance.
 Pay attention to the quality of paint when you are painting a room. I have learned my lesson. When I was young (and dumb), I bid a paint job at a customer's house. I figured out the cost of materials and estimated the time to complete the job and gave the customer the price. She agreed.
I bought cheap paint and it took twice as long to complete the job. The cheap paint took two coats and I took a shellacking. I don't buy the cheap stuff anymore.
There are several factors that go into a paint can and this is one of those cases where you get what you pay for. There is a definite quality difference between cheap paint and expensive paint. Cheap paint is usually under $10 per gallon whereas the expensive stuff is $20-$25 per gallon if you buy it by the single-gallon containers. The price gap closes as you buy paint in five-gallon containers.
Don't be fooled by the manufacturer's names either. Virtually all manufacturers make cheap paint and expensive paint so don't think you're getting a great deal just because an $8 gallon of paint has a recognized brand name on it.
All paint has pigments, resins and solvents in it. With expensive paint, the pigments are smaller and more pure. This gives the paint one of its main attributes: the ability to hide the surface on which it is applied. With cheap paint, the pigments are of lower quality and are larger (this means you get to give the wall two coats of paint instead of just one).
Resins hold the pigments together and create a "film" of paint. High-quality paints use high-quality resins for a more durable finish that lasts longer. You guessed it, high-quality resins are found in more expensive paint.
The solvent used in paint (water for latex paint) is just the carrier for the resins and pigments. Cheap paint has more solvents per gallon than does the more expensive paint. As the solvent evaporates, you are left with the resin and pigment that stays on the wall. So not only does cheap paint have poorer quality resins and pigments, per gallon it also has fewer of them.
If you had a device that could measure the thickness of a coat of paint, you would find something very interesting. Both cheap and expensive paint will go on wet at the same thickness. However, since cheap paint has more solvent per gallon than expensive paint, if you were to measure the thickness of each paint when dry, you would find that the expensive paint leaves a thicker coat.
When you use an airless sprayer you must thin (add water for latex paint) the paint so that it flows easily through the sprayer. You definitely have to thin the expensive paint, but the cheap stuff is usually so thin (I didn't want to say runny) you can spray it right out of the can.
Expensive paint also has additives that minimize mildew and help the paint to adhere to the surface better.
When you buy paint, buy the expensive stuff that is 100 percent acrylic. This may be the case where a $25 gallon of paint is cheaper than a $10 gallon of paint.
 Carpentry jobs are always fun. Have you ever had a door that closes by itself, and it isn't supposed to? Or maybe a door that doesn't latch correctly? These are actually pretty simple to fix.
Let's take the first problem. This door closes by itself because it is not plumb.
You could spend hours trying to get it plumb, putting shims behind hinges and chiseling wood here and there. Or you could decide to do the quick fix: bend the door's hinge pin. Now, you're not going to bend it by much, mind you, just enough to cause a little friction in the hinge. Pop the bottom hinge pin out by tapping it with a stubby screwdriver and a hammer. Set the hinge pin on a hard surface (not the kitchen table) like the sidewalk. Tap it gently with a hammer in the center of the pin so that it puts a slight crook in the pin.
Reinstall the pin by tapping it into the hinge with a hammer. If your door is large and heavy, you may need to repeat this with the next hinge pin to gain some uniform friction. Problem solved.
The other door that doesn't latch correctly is easy to fix, too, but not as easy as smacking a hinge pin with a hammer. This problem stems from the strike plate and the door latch not being aligned. The strike plate is the flat piece of metal on the doorjamb with the hole in it that accepts the door latch (the part that sticks out of the side of the door).
The door latch may be too high or low to enter the hole in the strike plate. The strike plate may be so far in that you practically have to throw your shoulder into the door to get it to latch. Assuming the problem isn't due to a warped door, you really have only two options: move the strike plate or the door latch.
If the alignment problem is due to a height difference between the strike plate and latch, try to move the latch first. Cut out a piece of cardboard and shim it behind one of the door hinges. If the latch is too high, place the shim between the doorjamb and the top hinge. If the latch is too low, shim between the doorjamb and the bottom hinge.
The other option is to unscrew the two screws that hold the strike plate and raise or lower it to meet the latch. The only downfall with this is that you will need to chisel out the wood in the strike jamb so that the plate sits flush with the jamb. This isn't hard, but it will leave a noticeable mortise. This, however, can be filled in with wood putty and painted.
Align the strike plate with the latch and make trace marks with a pencil on the jamb. Chisel out the wood to the depth of the plate. Use short, light taps instead of one big one as you will tear out more wood than you expect.
Fill in the old screw holes since you will likely be moving the strike plate a small amount (the screws will tend to wander into the old holes and make alignment nearly impossible). Slather wood golf tees with wood glue, stuff them into the holes and saw them off flush with the surrounding wood.
Hold the strike plate back up to the jamb and mark the location of the holes. Predrill small pilot holes and then screw the strike plate to the jamb. Your door should close and latch effortlessly.
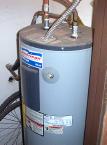 As I pulled into my neighborhood yesterday, one of the neighbors flagged me down to look at his water heater. It was belching water from the tank and so I helped him to turn it off and drain it. But it started me thinking about how we (myself included) neglect the maintenance on these things, and how the anode rod helps it to stay alive. Water heater repair is so fun.
A water heater anode rod is a "sacrificial" rod that corrodes away, sparing the tank the same fate. Although your water heater's tank is glass-lined, there are bare metal areas such as seams and fitting penetrations that are susceptible to corrosion.
Your tank's main defense is the anode rod. In fact, would you like to take a wild guess as to what manufacturers do to increase the warranty from 6 years to 12 years, for example? Among other things, they add a second anode rod.
An anode rod is made from magnesium, aluminum or zinc, wrapped around a steel-support wire. The rod is screwed into the top of the tank, but you may have to do some digging to find it.
It's a good idea to check the rod and replace it if it's damaged. Generally, if you can see 6 inches of the support wire, or if the rod is deeply pitted or split, replace it. You may get it out and discover that there isn't even a rod left. As long as a good amount of the anode remains, the tank should operate well.
The rod is attached either to a hex head or the hot water outlet nipple (called a combination anode). Look at the top of the tank and check for the hex head. If it can't be easily spotted, it may be hidden under a plastic plug or insulation, or under the metal top of the heater. I wouldn't recommend removing the top sheet metal cover as some of these are "foamed" into place with expanding insulation.
Before you start playing with the anode rod, turn off both the heater and the water supply. Open the nearest hot water faucet to relieve the pressure, or drain some water out of the tank from the drain valve.
Inspect the top of the heater for the hex head. If you can't find one, you probably have a combination anode. Disconnect the flex pipe to the hot water nipple.
You will need something stiff and thin like a coat hangar or other piece of wire. Shove it down the hot water outlet nipple. If the wire stops after about 6 inches, you have a combination anode.
Removing the anode is as simple as unscrewing it. Don't think it will be that easy, though. If you water heater is not aging gracefully, you may need some brute force to bully the anode into coming loose.
Once you unscrew the anode, you may have another problem: the overhead clearance may not provide enough room to pull the anode out. You will have to either drain the water heater so you can lean it far enough to pull out the anode rod, or you can bend the rod and pull it out. This means you will have to bend the new rod to get it in (although some rods are made in flexible sections). Bend it in the middle just enough to gain clearance into the hole. Then you can straighten it against the rim of the hole and screw it in.
If you have a hex head-type rod, you can always add a combination anode for more protection. Just wrap the threads with Teflon tape, drop it in the hole, and screw it in. You just may add a few years of life to the water heater.
 Ahh, the fragrant stomach-curdling smell of old food. You know, the kind that looks like a science experiment, except this isn't in a petri dish... it's in your garbage disposal. Coincidently, the garbage disposal isn't working.
At least half the calls I get for broken garbage disposals turn out to be easy fixes.
If the disposal doesn't make noise when you turn it on, press the reset button on the bottom of it. If the motor overheats or is overloaded, this button will trip and turn the motor off. Pressing the button back in will re-start the motor (you should also test the outlet to make sure there is power getting to the disposal and, if not, check the breaker).
If the disposal makes a humming noise, but doesn't grind food, it is jammed. Most disposals come with a tool to clear a jam. If you have lost yours, you can use an Allen wrench. Take the tool and insert it in the hole at the bottom of the disposal (near where the cord enters underneath). As you twist the tool, you will hear and feel the obstruction. Keep twisting until the blades move freely. If you still can't budge the blades, you'll need to remove the disposal and manually clean out the obstacle.
If your disposal is dead, plan on spending about $85 for a 1/2-horsepower disposal, and about an hour to replace it. You can save yourself some time if you buy the same brand of disposal, since the new one will attach easily to the old mounting ring.
To remove the disposal, unplug it and grab a screwdriver. You'll need to disconnect the dishwasher drain hose, which is attached with a hose clamp, and the drainpipe. They should easily disconnect, but have a rag handy to absorb a little water.
The only thing left holding the disposal in place is the mounting ring. The mounting ring squeezes a rubber gasket (the black thing you see when you look down at the sink) into the mounting assembly, which holds the disposal to the sink. The mounting ring has "ears" on it that hold it to the mounting assembly. It also has round lugs in it that will allow you to remove the disposal.
Stick a screwdriver in one of the mounting ears and, as you support the disposal, rotate the ring counter- clockwise. The disposal will drop off into your hand.
If you've chosen the same brand disposal, it should re-attach easily to the old mounting assembly. If you are using a different brand, you'll likely have to remove the old assembly and install the new one. Removing the old assembly usually involves unscrewing the mounting screws and removing the snap ring, gasket, mounting and backup rings, and the sink flange. The new mounting hardware will be included in the new disposal package. If you install the new mounting assembly, make sure you use plumber's putty under the sink flange to keep out the water.
Once the mounting assembly is in place, make the electrical connections in the bottom of the disposal (most disposals don't come with electrical cords included, so if the old cord is in good shape, save yourself $8 and re-use it).
You will need to connect the white wires together with a wire nut, then connect the black wires together. Connect the green wire to the grounding screw and replace the cover plate on the bottom of the disposal.
Next, if you have a dishwasher, remove the knockout plug by placing a screwdriver against the plug and tapping it with a hammer.
Hold the disposal against the mounting assembly so that the mounting ears fit into the openings in the assembly. Turn the mounting ring clockwise until the disposal is supported by the assembly, but don't fully tighten it yet. Line up the drainpipe so that it will easily connect to the disposal. If it is too long, cut it to length with a hacksaw. Attach the dishwasher drain hose to the dishwasher nipple on the side of the disposal and tighten the hose clamp.
Finally, lock the disposal into place by inserting a screwdriver in the mounting lug and turning clockwise until the mounting ears bottom out. Plug in the disposal and listen to the sweet sound of food being ground into oblivion.