 A Las Vegas handyman should be knowledgeable in various areas. As the weather gets warmer, homeowners will start checking out their sprinklers. You should have a sprinkler box surrounding your sprinkler valves.
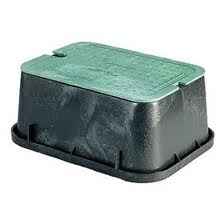
Installing a sprinkler box is much easier than installing sprinkler valves. The box fits around the valves and has a removable top. Remove the top and dig out the hole large enough so that the box will fit. You want the top of the box deep enough so that the lawnmower won’t hit it, yet you will still be able to service the valves without too much trouble. I have found that cutting out a portion of the bottom ends of the box makes things go much easier.
The trick is to place the box into the hole and eyeball where the pipes are in relation to the box. You will cut the bottom ends of the box to allow the box to fit over the piping and rest on the ground below. I use a jigsaw and the job goes very quickly. It doesn’t have to be pretty. The jigsaw will quickly cut the plastic sides out to your specs. You may have to make a few cuts to get the box to fit over the piping yet sit level. Once the box fits well, you can back fill the area around the box and push the cover on.
 As a Las Vegas handyman, I haul things around in the back of a truck all the time. Tooling down the freeway with items in the back of the truck can get dangerous, so you must take precautions that whatever you are hauling is secure.
We’ve all seen pickup trucks driving down the road with items stacked in the back that are twice as tall as the truck. I steer clear of these folks. You can see the rope they have used is straining and it looks like even a gradual turn will make it topple over.
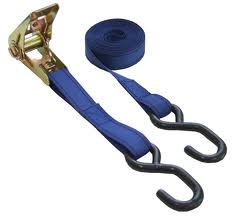
You can use a ratcheting tie down system that will cinch the load down securely. Many trucks have special channels that you can use as tie down points along the bed. If you have a lot of loose items, you might consider a cargo net. This will keep anything from blowing out of the bed as you tool down the road.
For lumber and such, using a standard pickup truck will make it so that the edges are leaning out of the rear of the truck. Sure, you can buy expensive systems that allow you to lower the tailgate and roll it out, but for people on a tight budget, I think ratcheting tie downs are the way to go.
If you don’t have tie-off points on the truck, you can buy anchors that fit into the holes in the rim of the truck bed. Place them and screw them down so the rubber compresses and holds it in place. Then you can use the hooks on the tie-downs, wrap the straps around the lumber and ratchet it until tight. The tie downs aren’t intended to lift weight, but they are great at holding things in place during transport.
 As a Las Vegas handyman, I get asked a lot of questions about houses. A customer recently asked me about stains on her granite countertop.
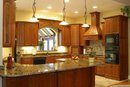
The stain on her countertop was right around her soap dispenser, and it was a good sized stain…probably a foot or so in diameter. I asked her if she ever sealed her granite. She said “What?”. Every time she washed her hands and went to pump soap she would drip water on the granite. The water was absorbing into the stone. Once she stopped doing that, the stain disappeared after about 10 days. So the message her was to seal the countertop.
The first thing to do is to clean the countertop. There are products made for both cleaning and sealing granite, and both can be found any most home centers. The packaging will give detailed instructions, but generally both are spray-on and wipe-off products.
Once you have cleaned the granite, you should apply 2 coats of the sealer. Again, you spray this on, let it sit for a period of time, and wipe it off. Then repeat. You know if the granite is sealed if you can drip water on it and it beads up like water on a freshly waxed car. There isn’t a lot of elbow grease involved which makes it nice.
You usually will need to seal the granite once or twice per year, but check on the bottle for recommendations.
 This Las Vegas Handyman has seen some wall penetrations provide easy entry for pests. Dryer vents, if they don’t have a cover, are loved by pests because they provide nice warm, humid air. So it’s a good idea to provide a cover to keep out pests and the weather.
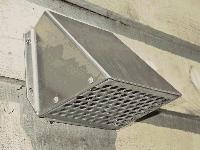
A vent cover attaches from the exterior of the wall and secures to the vent. Some covers are simply screens with a hood over them, and others are louvered so that the force of the expelled air forces the louvers to open.
Whichever style you choose, they install in the same manner. You will want to squeeze out a thick bead of caulking around the exterior perimeter of the hole. Place the vent cover into the hole in the wall and push so that the caulking in between the wall and the cover gets squeezed. This will help keep rain water from entering the area. Once you secure the cover to the wall, the vent from the dryer to the cover will need to be connected. Usually a few self-tapping screws and some foil tape are all that is needed for this step. Once you have everything together, go back and caulk around the perimeter of the vent cover to further stop the weather from getting behind the cover.
 Being a Las Vegas handyman requires one to work in pretty extreme conditions. In the wintertime when it can hover near freezing, you can always add layers of clothing and drink something warm. But it’s the summer heat of the desert that really makes me suffer. The following are things I do to make sure I make it safely through the day.
If I know I will be working outside for extended periods of time, bring the right clothing. In addition to sunscreen, wear a wide brimmed hat and sunglasses, and wear loose fitting light colors…even a long sleeved shirt. There is a reason you see so many landscapers working with long-sleeved shirts on; they keep the sun off of your skin and still allow you to sweat which will evaporate and keep your skin cool. You can also keep a wet rag around your neck to help cool you.
Take advantage of ANY shade you can find. For example, if you are prepping a new sprinkler valve for installation, do it under a shade tree rather than leaning over the sprinkler box directly in the sun.
Finally, and most importantly, you must hydrate. Drink plenty of water frequently. If you sip water throughout the day and maybe have a regular snack for energy, your body will function better. If you get to the point where you feel thirsty, you are already in trouble.
I learned a valuable trick when installing a sprinkler system in 110-degree heat many years ago. Fill a one gallon jug of water about 2/3rds full and put it in the freezer overnight. As the water freezes and expands it will fill most of the bottle. When you head out into the heat the next day, remove the nearly full jug and add water to fill it up. As you work throughout the day, the ice will slowly melt leaving cold water for the majority of the day. It sure beats drinking warm water.
 If you've got a loose railing or a wrought iron fence that sits on top of concrete or concrete block, there is an easy way to reattach it. If you are like this Las Vegas handyman, you want to try the easy things first. The railing will be held to the concrete by a fastener, typically a concrete anchor. If you are lucky, you can tighten it up and be done. There is a nut that holds the railing to the concrete, simply tighten this nut and cross your fingers that it works.
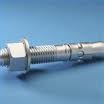
You may have to use a larger anchor. If that is the case, you will have to remove the old anchor and drill the proper sized hole according to the size of the anchor you are using. You can use a standard drill with a masonry bit, which will take longer, or you can use a hammer drill which will quicken the job.
Once the hole is drilled you can use a redhead anchor. This anchor drops in the hole and has bolt threads sticking out of the top. Once the anchor is in the hole, set the railing on top of the bolt and add the washer and nut. Tighten the nut down to firmly hold the railing in place. As you tighten the nut the anchor grabs the walls of the hole you drilled for a solid installation.
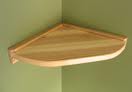 If that corner in your room is beckoning you to do something with it, you might try installing a corner shelf there to put pictures, books, or maybe even a TV. So here is how a Las Vegas handyman goes about it?
You can buy a corner shelf at a home center, but these tend to be a little small for storing or displaying anything of substance. You can certainly make one out of solid wood, MDF (medium density fiberboard), or even melamine, but you will have to install a decorative edge on the melamine or you want to curve the shelf. You need to figure out the size and whether you want the shelf curved or straight across. After that it is a matter of determining how you want the shelf to appear...paint, stained and varnished...you decide.
So all that is left is to install the shelf in the corner. I like to use 2 ledger boards for this. You can use 1"x2"s and, after making sure they are level, screw them at your designated height into the wall studs. The shelf will sit on top of these boards and get secured to them with countersunk screws.
If you need a little extra support for a heavier object (like a TV), you can install some cross braces using the same 1"x2"(or larger) wood supports that span from one ledger board to the other. These cross supports will minimize deflection and give the shelf more stability.
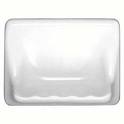 Little kids love using the soap dish as a handle to pull themselves out of the bathtub. It's also the perfect height for a women to rest her foot on as she shaves her legs. So a soap dish takes a lot of abuse, until it finally comes off of the wall. So what do you do then? Well, you can call your favorite Las Vegas handyman, or you can grab a few items and stick it back on the wall yourself.
Some soap dishes are simply glued to the existing ceramic wall tile, and other ones are glued to the cement board or green board and then the ceramic tile is placed around the soap dish. Whichever style you have, you may be able to reuse it or you might have to purchase a new one.
If you are sticking it back on to the ceramic tile surface, use mastic and get it nice and level. Once you have the soap dish in place, use some blue painter's tape to hold it there until the mastic dries, and then remove the tape.
If you are installing the soap dish into the pocket created by the surrounding tile, after you clean out the area, you can use mortar or mastic, again using the tape to hold it in place.
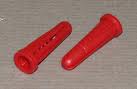 Sometimes when you are looking to hang something on the wall, there isn't a wall stud where you need it to be. A Las Vegas handyman deals with these types of issues all the time. I personally don't like plastic hollow wall anchors. These are plastic cone-shaped inserts that do into the wall to hold a screw. These are geared more for small screws with small threads.
You've probably bought products that get secured to the drywall that come with these hollow wall anchors. These anchors get tapped into the drywall. Once the anchor is imbedded into the drywall, you can install the screw which tightens into the hole at the center of the anchor. There are good and bad with these anchors.
The good point of these anchors is that they are easy and convenient. However, I dislike them for any kind of holding power. Since they are plastic, you can't fully tighten the screw in the anchor. If the item you are hanging has any kind of weight to it, it could pull the screw out of the anchor.
There are certainly stronger, more reliable anchors to use such as molly bolts (aka butterfly bolts), and EZ anchors. They will hold considerable weight and are easy to install into the drywall.
That's right, my ANNUAL power bill. I've been a convert for 2 years now, and I never thought I would say this without feeling like trailer trash, but I love my swamp cooler. Before you get visions of me in a trailer, let me tell you that I was converted by some neighbors. I'm lucky to live in a nice neighborhood with many of my neighbors being self-employed or professionals. Yes, they use swamp coolers too. If it makes you feel better, you may call them evaporative coolers.
As a Las Vegas handyman, I am both blessed and cursed to live in a hot, dry summer climate. This combination of dry heat is perfect for a swamp cooler. For those of us that live in a desert climate, we tend to use the bulk of our annual power during the summer months. So naturally, the summer is target-rich for cutting your power bills.
My power consumption went down so dramatically that the power company paid me an unannounced visit on a holiday Saturday to snoop around and make sure I wasn‘t stealing power from them. I'm not sure if they love me now or hate me.
So, I've established that a swamp cooler will save you money over a traditional air conditioning system, but I will be the first to say that a swamp cooler is not for everyone. It's not the type of thing you plug in and forget about. You will need to replace the cooling pads and keep an eye on it and the weather. Humidity is the arch-nemesis of the swamp cooler, but if the air is dry outside you might want to keep the winter coat handy.
A well-tuned swamp cooler should be able to drop the temperature by 30 degrees, so if it is 100 degrees outside, look for inside temps of 70 degrees.
The biggest challenge for a homeowner is where to install a swamp cooler. Ideally, install it on the north side of the house (where it's shady) through a window that raises up-and-down. If you have to install it where the sun will hit it, arrange something to cast shade upon it. If the sun hits the unit, it will warm the air by a few degrees, which is very important. I like a side-draft unit installed through a ground floor window, but you can certainly cut a hole in your wall to accommodate it. Of course, you need to take precautions so that security in maintained with window locks, etc. should you choose to place it in a window.
Using a swamp cooler takes a different mindset too. Basically, you are pressurizing the house like a balloon. You must exhaust the air so that you get airflow. This is accomplished by slightly opening some windows or by using up-ducts (trademarked as "Up-Dux"), which ventilate air into the attic. You can plan on venting 1-2 square feet of space for every 1000 cfm (cubic feet per minute) of air the swamp cooler produces. If you don't want airflow in a particular room, don't ventilate air in that room (i.e don't open the window or install an up-duct). To determine how much cfm you will need, take the volume of air in your house and divide that number by 2. For example, if you have a 1,400 square foot house with 8 foot ceilings, you would need 5,600 cfm of swamp cooler output (1,400 x 8=11,200. 11,200 /2=5,600).
After I install a swamp cooler, I will level it and fill in any gaps with weatherstripping. If you have a side-closing window you will need to fill in the top portion with a material that makes you comfortable...many people use plywood although this isn't very attractive. I let the unit run and check the wetness of the pads. If the pads are not uniformly wet, you are allowing hot incoming air to mix with the cooler air that the unit has produced, which will raise the temperature of the air entering the home. Every degree counts. If there is a dry area on the pad, I will recheck for level, and if necessary drill more holes in the water supply trough that feeds the pads.
At some point you will have to perform maintenance on the unit. Here is some information on how to replace a swamp cooler pump and how to replace a swamp cooler motor.
There are certainly times during the summer that I have to shut off the swamp cooler and turn on the traditional air conditioning. This lasts for about 3 weeks, from late July to early August, and is due to the "monsoon season" and the high humidity levels.