 To a handyman, toggle bolts solve many problems. They are fantastic for holding things to drywall where there is no wall stud to mount into. Ideally, you want to install into a wall stud, but if none exists where you need it, a toggle bolt is just the ticket.
Toggle bolts are perfect for jobs like installing toilet paper holders, towel bars, and towel rings to the wall. Really most things that need to stick to the wall, but don’t require a stud to support weight. Things that support some weight are not good candidates for toggle bolts as theoretically, they could pull out of the wall under those conditions.
You will need to select the right size of toggle bolt, and that usually means looking at the holes in the bracket and considering the function.
Remove the toggle from the end of the bolt and push it through the bracket you are installing. Place the toggle back on the end, but thread it just enough that it stays on the end of the bolt and doesn’t fall off. If you screw it too far onto the bolt, the wings of the toggle may not open far enough for the toggle to engage. Drill a hole large enough for the toggle to fit through. If the hole isn’t quite big enough, you push and twist it through.
You should hear the wings of the toggle spring open once they clear the back of the wall. Now you have to tighten the bolt and draw the bracket to the wall. It helps to pull the bracket away from the wall as you tighten the bolt. This will keep the toggle engaged to the back of the wall and make securing it easy.
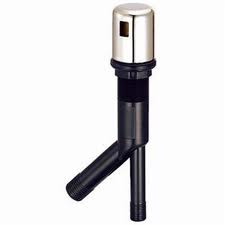 A dishwasher air gap sits in between the drain hose and the end point where the water drains out (typically the garbage disposal). Some people don’t install an air gap and instead just connect the dishwasher drain hose directly to the garbage disposal inlet. That’s a no-no.
It is not difficult to install an air gap for the dishwasher. You will need about $20 in parts and about an hour of your time.
You will need the air gap itself, a hose that runs from the air gap to the dishwasher, and a handful of hose clamps to hold everything together. Ideally you need a hole in your sink or countertop for the air gap to sit (although some people will just attach the dishwasher drain hose to the underside of the sink creating a “high loop).
Under the sink, connect the dishwasher hose to the small inlet of the air gap with a hose clamp. Connect the larger outlet of the air gap to the discharge hose that you bought and the other end to the garbage disposal inlet (be sure you remove the knock-out plug from the garbage disposal first) and secure everything with hose clamps. Push the air gap into the hole in your sink or countertop and screw on the retaining nut. Then you can install the decorative cover over it. Run the dishwasher’s “rinse and drain” setting and check for proper operation.
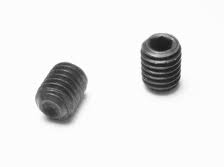 A handyman runs into set screws often, but just what is a set screw? A set screw is a small mechanical part that spends most of its life hidden from view. Pretty much the only time you see it is when you remove it. Think of a regular screw only without the head on it. If you see a small hole in, for example, a faucet handle, there is probably a set screw in there.
As I said, set screws stay out of sight, and they are sometimes hard to find, especially when you need to. You will find set screws that hold on faucet handles, toilet paper holders and towel bars, tub spouts, etc. You probably don’t even notice the holes where the set screws are because they are designed to be inconspicuous. For faucet handles, look at the rear of the handle. For toilet paper holders and towel bars, you will find them on the bottom of the holder, and for tub spouts you will find them underneath the spout. The tub spout is particularly challenging because you practically have to stand on your head to see it (or use a mirror).
Removing them takes either a small Allen wrench or standard screwdriver (like the eyeglass type). If you can see the head of the set screw with a flashlight, great, but otherwise it is a process of “feeling” for the set screw.
 A handyman gets asked to do all kinds of things, including installing a safe. Fortunately, the safes we install are relatively lightweight.
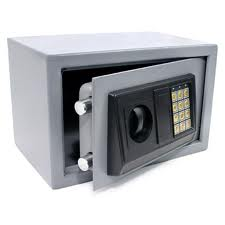
You can buy a small safe at any lock shop, or even at a home center. They are not big, but are they are heavy enough for one person to struggle with. A home safe is great, but since it can be carried away by one person, it makes sense to secure it to the building.
You will have a couple of options. If you have a concrete slab, you can install some anchors and secure the safe. If you have a wood subfloor, you can install it with lag bolts. These are usually included with the safe.
Place the safe where you want it. Open the door of the safe and there will be some small holes at the bottom of the safe’s floor. These are where you will anchor the safe to the floor. Use a pencil and stick it through each hole. This will make a mark on the floor. Move the safe away and drill pilot holes in the floor. If you have wood floors, drill holes slightly smaller than the shank of the lag bolts. You can then move the safe back into position and screw the bolts into the floor from inside the safe. If you are installing the safe onto a concrete slab, you will need to drill holes to fit the concrete anchors, and then place the anchors into the holes. You will have to place the safe over the anchors so that the anchors mate with the holes in the bottom of the safe. Then you can install the nuts over the threads from inside the safe.
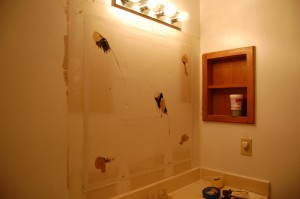 Here is a handyman tip that demands safety. Removing a bathroom mirror from a wall certainly doesn't look intimidating. In fact, the mirror can look as if it is held to the wall with a few fasteners. Easy right? Not so much. Most likely the mirror has been glued to the wall, and when I say glued, I mean the wall will come down along with the mirror.
The mirror gets glued to the wall with mirror mastic or other suitable adhesive. Usually, you will find large globs of adhesive behind the mirror. For this reason, you will have drywall repair to do after you remove the mirror, or you might decide to cover the damage with a different mirror.
At the minimum, safety goggles and gloves are mandatory. If you are lucky, the mirror will slowly peel off of the wall without breaking. By the way, the larger the mirror, the more help you need to get it off in one piece.
I use a stiff putty knife 3-4 inches wide. The stiffer the better. I also use a long standard screwdriver. Start by inserting the putty knife behind the mirror and gently lifting. When the mirror starts to lift, insert the screwdriver in and continue to pry the mirror. As you lift the screwdriver, move the putty knife over a few inches and push it behind the mirror and gently lift. Slower is better here. You should hear the drywall paper tearing as you lift. Do this slowly. The goal here is to remove the mirror in one piece so that you are left with repairing the drywall. The last thing you want to do is to lift to aggressively and break the mirror. Not only will you damage the sink, floor, etc., you may also injure yourself. Be careful on this job and go slowly!
 As a handyman, I see missing smoke detectors all the time. It is usually the case that the detector was chirping and the homeowner removed it because it was bothersome, and probably keeping him awake at night. All that is left is the pigtail plug sticking out of the ceiling. It may be that they just didn’t get around to replacing the battery.
You will need a new smoke detector if you can’t find the old one. If you are lucky, the new smoke detector will mate with the existing plug and will plug right in. If not, you will need to remove the old plug and wire in the new one that came with the new smoke detector. This isn’t difficult at all.
This is a direct wire-for-wire replacement. You can turn off the power at the breaker. You will notice that the plug has a black wire, a white wire, and either a yellow or red wire (which you may not even use). The house wiring in the ceiling has the same colors. Remove the wire nuts from the old plug and replace the new plug wires into the positions of the old plug wires. Tighten the wire nuts and then you can plug it into the new smoke detector. If you old plug didn’t connect the yellow or red wire, then don’t connect it either. This wire is an interconnect wire that makes all of the detectors go off simultaneously, rather than just the detector that has sensed smoke.
By the way, you might replace the cheap battery in the detector with a new one while you have it in your hand. The batteries that come with the new detectors are not a high quality battery, and you don’t know how long it has been sitting on the shelf.
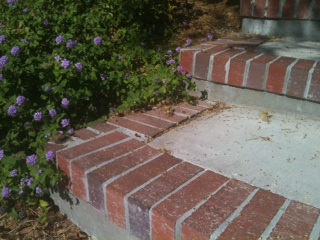 A straightforward handyman project is replacing a broken brick veneer on a concrete step. You see these at the edge of the step. The veneer pieces are typically 3/8"-1/2" and are shaped like an "L" with part of the veneer on top of the edge and part extending down the front.
These pieces get cracked when someone moves a heavy object over the front of the stair and either lets the object slam down on the next step or the step just cracks due to the stress.
You can chisel out the old veneer brick piece with little difficulty. What you will be left with is the mortar from the old veneer piece. A great tool for this is an angle grinder with a masonry wheel in it. Wear eye, ear and breathing protection (along with gloves) and grind out the old mortar. You can remove more than you think necessary because you will fill the void with new mortar and push the new veneer piece into it so that it is level with the surrounding pieces.
The biggest challenge will likely be finding a good match, but once you have it, the job will take less than an hour. By the way, it is probably a good idea to cover the new veneer piece and neighboring pieces with blue painters tape to keep the mortar from filling the pores. True, you can wipe it off, but you will be left with gray colored pockmarks in the brick surface which will draw attention to the repair. If you use the tape, you can peel it off and not have to worry about removing the mortar from the surrounding pieces.
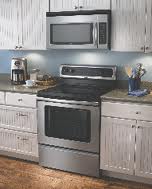 Having a handyman install a microwave hood above the range is a great convenience and a space saver. Removing the builder-grade vent hood takes just 5 minutes and the removal of four screws, but some people have difficulty getting the electrical cord run up into the cabinet.
The old vent hood will have a cord that runs through a hole and into the wall cabinet. Too often, people attempt to force feed the cord on the new microwave hood into the hole of the old vent hood. In most cases, the hole is in the wrong place and so the thick cord can get pinched between the top of the microwave and the underside of the cabinet. It is much easier to cut a hole in the correct location. This way the cord isn’t pinched and the microwave sits correctly without having to force it.
The new microwave should come with a template that shows you the exact location to cut the hole. Tape the paper template to the underside of the cabinet and mark out the hole. Use a hold saw and bore the hole. If you don’t have a hole saw you can drill a series of holes and just cut out between the holes. You can also use a jigsaw if you want. It doesn’t have to be pretty, just functional as the hole won’t be seen.
Once you have the hole cut, you can hang the microwave on the wall bracket and feed the cord through the hole to plug into the outlet in the cabinet.
 A handyman sees this all the time: towel bars seem to become loose and finally work themselves free of the drywall. There are plenty of ways to secure a towel bar to a wall. The preferred and most lasting way is to mount it directly into a wall stud. This is great if the supports actually line up with the wall studs, but that doesn’t normally happen. You can mount one side to a wall stud and use a wall anchor (or a toggle bolt) for the other side.
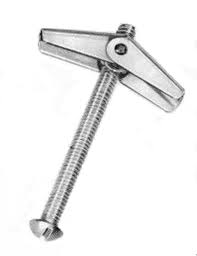
People usually ask about toggle bolts when one side has ripped out of the wall. I also like EZ anchors so long as the damage is small enough. The toggle bolt (aka butterfly bolt) works great but you will have to make some modifications to the bracket. Usually, the hole in the bracket is too small to insert a toggle bolt. So you will have to drill a larger hole into the bracket to accommodate the bolt.
Place the bolt through the hole in the bracket and then screw on the toggle just so that the bolt holds it. You don’t want to screw the toggle so far onto the bolt that there isn’t enough clearance for the toggle to open up. By screwing it onto just the end, the toggle will clear the back of the drywall and open up. Then you can pull the bolt head towards you (away from the wall) and tighten. Pulling the bolt outward engages the toggle into the back of the drywall and allows you to tighten the bracket to the wall.
 A consistent handyman repair is a closet rod that has pulled out of the wall. The majority of the rods are wood, and the main reason is that they are overloaded with clothing. Tons of weight onto the wood rod and it will come down.
Many of these rods are held in place with plastic cups which are then screwed into the wall. Plastic doesn’t hold a lot of weight, and the screws may or may not be long enough to hit a wall stud. Is it any wonder the closet rods come down?
If you are lucky enough to find a wall stud, use some longer screws and secure the holders into the studs. Better yet, I like to use a short length of 2 x 4 lumber. Use a piece that is long enough to span across 2 wall studs (it will be in a closet so nobody will see it anyway). Cut a “V” shape in the center of it so that the closet rod will rest in this “V”. Cut one for both ends of the rod and screw them into the studs. You can also buy center supports if needed. These hang from the shelf above, and some also mount to the wall.