Have you ever walked through a house and marveled at the intricate ceramic tile medallions or borders and wondered how the installers got it so perfect? The answer is they didn't.
You or your handyman can buy beautiful medallions or intricate border pieces that look as if Michelangelo made them. They come in ceramic, marble, travertine, tumbled marble...whatever surface you are working with you can find these fine finishing touches. What you don't see is the netting that these intricate pieces are glued to before they are installed. Buy purchasing them in this "ready to install" fashion makes them virtually as easy to install as regular square tiles. Here is an article on ceramic floor tile installation.
I've also seen people make their own medallions and borders. You can break or cut several styles and colors of tile into random pieces or cut them into uniform pieces. Then buy the netting and glue them into whatever shape or design you want. The spaces in the netting allow the mortar to pass through to the tile and adhere to them like regular tiles.
The medallion is usually installed first and the surrounding field tiles are installed around it. Once the mortar is dry the entire surface is grouted and buffed clean.
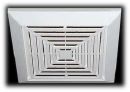 If your bath exhaust fan doesn't work, it's a good idea to run down a list of common-sense items to see if you can avoid calling your handyman.
You first want to check to see that your exhaust fan is getting power. The exhaust fan typically hides behind the decorative grate on your ceiling, so if you pull the cover downward, you should see it, the fan's plug, and an outlet. If the plug isn't plugged into the outlet, plug it in and see if it works. Many homeowners unplug the exhaust fan because it is loud and bothersome.
If the fan still won't run, check to see that the outlet has power when the switch is turned on. If it does have power, then the fan is bad and should be replaced. If the outlet does not have power, try looking for a GFCI outlet that may have tripped off. When you find the suspect outlet, press the "reset" button on it to restore power to it and to all outlets that it feeds downstream of it. This should solve your problem.
If you need to replace your exhaust fan, it is easiest if you buy the same size fan so that it sits in the existing box in the ceiling. Here is an article on a bath fan replacement.
 So you bought yourself a beautiful new garden hose and are tired of rolling it up on the ground. You can buy a variety of hose reels and hangars to neatly store it and have it ready to use quickly. You can buy moveable hose reels that you can wheel around from the front of your house to the back, or you can affix a hose reel to the side of your house.
For the portable style, it's a matter of screwing on the garden hose to the hose reel, and then securing the hose reel's leader hose to the hose faucet on your house. Then you are ready to start spraying water. You shouldn't need a handyman for this style of hose reel.
For the style you secure to the side of your house, you will need to drill some holes in the house. If you have wood siding, you might get lucky and hit a stud and for this you can use large wood screws. If you have brick or stucco, you should hold the hose reel (or a template) up to the house and mark the locations for the holes. Use a masonry bit and drill the holes. Use the proper anchors in the wall, hold the hose reel up to the wall, matching the hole pattern you drilled. Then install the fasteners to permanently mount the hose reel to the wall.
It's a good idea to mount the hose reel close to the hose faucet so you can attach the hose to the faucet and have the hose always ready for quick use.
 Every once in a while, you will be driving along and see a something that just stands out. We had a list of handyman jobs to do at a customer's house and noticed a very lush area of grass surrounded by a grassy area that wasn't so lush. When you have a patch of grass that is 12 inches tall and dark green, and the rest of the grass is 3 inches tall and light green...I would suspect a problem.
The problem in this case is a pipe leak that is feeding this tall, lush grass. If you step on this tall grass, it will likely be very mushy and soft. So you know you are going to have some digging to do. You might also check the water meter for movement. It may be that the leak is occurring on a main line and is leaking constantly, or it may be that the leak only happens when the sprinklers are turned on. If the ground is mushy, it's a good bet the leak is constant, but you can verify that by seeing if the micrometer is moving on the water meter when there is no water running in the house.
At this point, you will need to shut off the water and start digging out the area until you find the source of the leak HINT: it will be right under the tall, lush, green grass. Here is some information on how to repair a PVC pipe leak.
 Most people are a little afraid to cut a hole in their wall, and with good reason. It makes this handyman nervous to cut a hole in a wall too. However, there are times when you will, for example, want to install a dog door through a wall and the cutting must be done.
I always cut the interior drywall surface first. It allows you to use a shallow cut to see what lies behind the proposed location. A drywall saw tilted so that just the tip goes slightly into the wall is usually safe. Once the drywall is removed, you can see if there are any potential problems to work around.
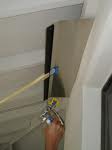
For cutting through stucco, I like a 4" grinder with a masonry blade or a carborundum blade. Since the small blades are circular, they allow you to cut shallowly into the wall. You want to avoid cutting blindly in a wall for fear of hitting an electrical cable, a gas line or a pipe. Even using a circular saw is safer than using, for example, a reciprocating saw. With a reciprocating saw, you will blindly be cutting through the surface which is dangerous.
For wood surfaces, you can still use a circular saw to cut the wall. Place the toe of the saw against the wall and slowly lower the spinning blade into the wall. Make sure you wear eye, ear, and breathing protection.
 With the heat of summer approaching, people are running their sprinklers more often. You can see issues develop quickly when part of the lawn in brown and the rest is green. There are many times a handyman will see sprinkler heads that have popped up but are not spraying. This tells me that the water pressure is there to force the sprinklers up but that something is obstructing the water from actually spraying.
In this case, you can turn the sprinklers off and inspect the heads for debris. You may be able just to unscrew the sprinkler head from the riser and tap out the debris, or you may be able to poke it out of the orifice with a small paper clip.
Other sprinkler heads are adjustable for spray pattern and distance. You can open the spray head wider to allow water to blow out the debris. If that doesn't work, open the small screw on the top of the sprayer head to allow a higher volume of water through the head, once you have a normal flow, you can re-adjust the sprinkler head.
If you had to remove the sprinkler head from the riser, screw it back on and align it toward the area you want watered.
It may be that debris entered your system through a break in a water line and when the pressure stops, it allows small amounts of sand and debris into the system.
 If you've ever used an airless sprayer to paint a house or trim, you know it can make quick work of a large project. That is, after you have spent hours covering everything that you don't want painted. That is what takes the time.
For jobs like spraying the exterior trim on a house, you can mask off the surface that you don't want painted or you can shield it using a paint shield. You can buy a paint shield that consists of a rectangular piece of sheet metal affixed to a broomstick. You can also use a piece of cardboard or whatever you have at hand. The trick is to place the shield snugly next to the surface you are painting in a consistent manner so you get a nice even paint line.
What ends up happening is that your paint shield will become so saturated with paint, you will be forced to stop and wipe off the paint before it runs off of the shield and drips where you don't want it to. Or you can throw away your piece of cardboard and get a new one.
I like the store-bought paint shields, but I would doctor it up a bit. My handyman tip is to cover the shield with several layers of masking paper secured by painter's tape. Layer the masking paper strips on top of each other so that when the paper becomes saturated, you simply tear off the saturated sheet and start spraying with the next clean sheet below. It will save you a lot of time.
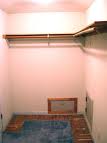 If your house was built in the last decade or so, you probably don't have to worry about calling your handyman to fix your closet rod. Many builders used the wire shelving supports and rods and they are well anchored from many different points. For those of you with a long wood rod being held up by plastic holders on each end...be afraid. Be very afraid.
This is a common call in older houses. The longer the wooden rod or the fewer supports for it, the more likely you will need to reinforce it. It seems that people have to fear of loading up a flimsy closet rod with enormous amounts of clothing, and therefore, weight. You would think that when the rod is bowing down to the floor that people would stop adding weight to it. Nope...if they can squeeze another article of clothing on the rod, then that's what they are going to do. It's funny when they are surprised that it falls down.
A typical installation for a wooden closet rod is to install a plastic holder on each end (they should be illegal to install), and a 45-degree shelf support in the center.
The repair I favor is to add a short piece of blocking (a piece of a 2"x4" works great) to each end. If you have a drill press, chuck a bit in the press to match the diameter of the rod and cut out a half-circle along the top edge of two blocks (one for each side). You can remove the plastic holders at each end and replace them with the blocks. Screw the blocks into the studs and you should be able to do pull-ups on the closet rods without them falling down.
If you don't have a drill press, use 2 small pieces of a 2"x4" and form a "V" out of them. Secure them to the wall into the studs with screws at the point the closet rod meets the wall. The closet rod should rest in the "V".
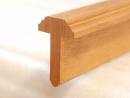 If you look at a set of double doors, you will see a piece of molding right in the middle of them. This molding is called a T-astragal and attaches to the stationary door. It acts as a strike jamb for the swinging door to close into. On interior door sets, there is no weatherstripping, but on exterior doors, there is a groove in the T-astragal for weatherstripping to seal out the elements.
In my handyman experience, it is the interior door sets that have the T-astragal damage. Interior T-astragals are typically made of wood and someone will impact it and cause it to chip or split.
There are many types of T-astragals. Some doors need to be rabbeted to accept the T-astragal, but most modern doors do not. They can be pried off and replaced with a new one. They typically have to be ordered and once they arrive, they can be cut to length. Once the length is right, they can be glued and nailed to the edge of the door and painted.
The body of the T-astragal is fairly thick, so it can be mortised for the door latch. Since the T-astragal is mounted on the stationary door, the door knob and latch on the swinging door need somewhere to latch into. Once the astragal is mortised, a strike plate is secured to it and the doors will then close and latch together.
 As a handyman service, we see water damage in houses almost daily, and much of it is caused simply by neglecting routine maintenance items. When caulking starts cracking or peeling up in a shower, it's time to replace it. If you let it continue, water will creep behind the caulking and into the drywall causing it to swell. From here, things only get worse, with tiles falling off and the possibility of mold growth. In wet areas like this, you should be using cement board.
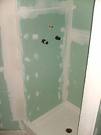
Greenboard has the same gypsum material as drywall with the exception that greenboard has a waxy paper on the outside rather than regular paper. This waxy paper helps the greenboard to resist water. As it's name implies, greenboard is green in color. Greenboard is meant for damp locations and is "water resistant". It is not water proof as many people falsely believe.
For wet locations such as a shower, cement board is the preferred material. You can buy it at home centers under the name "Wonderboard". Greenboard costs slightly more than regular drywall, and cement board is at the top of the pricing structure. Although green board is frequently used in wet locations, you might consider spending the extra money for the cement board.