 If you’ve ever dinged baseboard molding you know it can be unsightly. A good bump with a piece of furniture is all it takes to make a nasty eyesore. Fixing it is relatively easy. All you need is some wood putty and a putty knife.
It really doesn’t matter if the damage is on a flat surface or a curved surface as you can make the putty knife follow the contour of the molding fairly easily.
Normally the damage is caused by compression, but if you have any loose fibers in the damaged area, remove them. If any damage is rising up above the surface of the surrounding wood, cut it off or push it down below the surface.
Use the putty knife and mix up the wood putty until it is blended. Scoop out a little putty and push it into the damaged area. The goal here is to get the surface to match and blend in so that when it is painted it will be unnoticeable. It is better to use too little putty than too much. This stuff is like concrete when it dries. I would rather use several thin layers that one thick glob to fill the damaged area. When you have the surface level, let it dry. You might decide to add another layer based on what the previous one looks like.
Once you are satisfied, you can use some fine sandpaper and give the area a light sanding. The putty will dry with somewhat of a grainy appearance and the sandpaper will help that go away. After you have sanded it, you can paint the area to match.
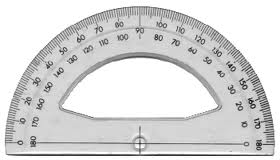 Every once in a while you will have baseboard cuts that won’t make sense. The inside corners are where I see this most. Maybe the drywall didn’t come together as the installer thought. The angle won’t be anything traditional, so you have to get a little creative.
I have found a protractor to be a good tool in this situation. You could certainly get the angle close by eye and then caulk any mistakes, but that may not look very nice. You may also use a couple of scrap pieces of baseboard and try to get the angle close, but a protractor will tell you what the angle is. All you have to do is create the angle on paper.
This is easy. Use two pieces of notebook paper and lay one piece along one wall and lay the other piece of paper along the other wall. Push both pieces of paper into the corner until they overlap at the corner. It’s easy to imagine if the paper represents your baseboard. Once the corner is covered by the two pieces of paper, tape the papers together and then pull them out of the corner. Now lay the protractor down on the papers to tell you the angle of the corner. Whatever the angle is, divide that number by two and you have your miter saw setting. Cut each piece of baseboard to this angle and your corner should be perfectly mitered.
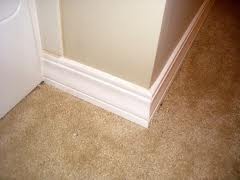 Baseboard corners take a beating. It doesn’t matter if they are 90-degree or rounded, whenever you move something around the house, they have a target on them. So invariably they will get nicked, scratched or dented and you will have to repair them.
Wood putty will quickly become your friend. In a pinch you can also use drywall mud, but if it gets bumped again, it will fall apart very easily.
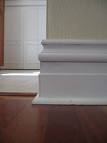
For a straight section, use a putty knife and mix the wood putty thoroughly. You want to blend in the liquids and the solids and evenly distribute the color. Scoop some on the putty knife and follow the section on the baseboard, pushing the wood putty into the depression as you go. Use as little as possible to get the job done as sanding this stuff is like sanding concrete. You want to slightly overfill the void but not by too much.
For curved sections, follow the contours with the putty knife and don’t overfill it by much. When everything has dried, use sand paper to get the surfaces flush and then paint the baseboard. If you happen to overfill the depression by a lot, you can use a more aggressive grit of sandpaper and then work your way down to a finer grit for a smooth finish.
 If you've ever installed baseboard, you've probably experienced the frustration gaps in the baseboard. These are not defects in the baseboard, I'm talking about "operator error". Not that it would totally be the installer's fault, but let's face it, you installed it.
Walls don't run perfectly straight, or maybe there is an issue with the flooring...whatever the reason, you need to make the job appear to be perfect.
If you or your handyman are installing baseboard that will be painted, you are in luck. Caulking can make lots of gaps go away. In fact, I know production installers that don't even miter the inside corners. Instead, they cut all inside corners to 7-degrees, put the ends together and caulk the entire corner. Most people wouldn't even notice once it's painted.
For the rest of us who try to do a nice job, you will miter the inside corners. This will get the corners very close and allow you to use a minimal amount of caulking to conceal the gaps. Once the caulking dries, the paint will blend everything in.
If you are installing hardwood baseboard that will be stained and varnished (i.e. very noticeable and difficult to conceal gaps), you can also cope the inside corners. Coping is the practice of cutting the profile of the baseboard into the adjoining piece. It is time consuming and exact work...not something you would want to spend the time on unless you are using baseboard that will be stained and varnished, such as oak or maple.
For outside corners, you have a couple of options. You can increase the miter cut by 1 or 2 degrees which will give you a tight corner at the front, but a tiny gap at the wall. This can then be caulked and painted. You really don't have the option of caulking if you are going to stain and varnish the wood. Instead you can burnish the corner. Burnishing compacts the wood fibers. If you have a small gap at the front of an outside corner, you can burnish it by using the round shank of a screwdriver. Run the shank along the gap and the wood fibers will compact together and close the gap.