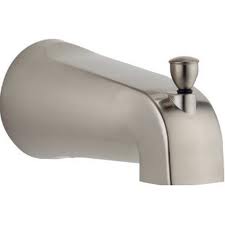
 If you have water leaking from your tub spout, you need to determine the root cause. Does the spout leak when the water is turned on or does it leak when the water is off? If your tub spout also has a diverter on it to shoot water to the shower head, it is common for some water to leak out of the tub during the shower, as the diverter usually doesn’t do a perfect job at stopping all of the water.
A valve behind the handle controls the flow of water to the tub spout. If water flows out of the spout when the handle is turned off, the problem is with the valve, and not the spout. You likely need the cartridge replaced (if a single handle valve) or the stem and seat replaced (for separate hot and cold handles). If water leaks from around the spout when the water is on, you need to check the tub spout and see if it is installed correctly. Tub spouts are either threaded on, or there is an o-ring that seals out leaks. These connections can get corroded and nasty, so maintenance is common. You will also get a leak if you try to rotate the tub spout once it has been installed, so once is it on, leave it alone unless you have a problem.
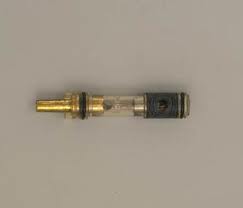 A shower cartridge is the part inside a shower valve that controls the flow of water to the shower head. The cartridge is connected to a single handle that turns to allow the blending of hot and cold water. How to you know when the cartridge becomes worn?
There are several signs of a cartridge needing to be serviced or replaced. The most obvious is that you have a drip or running water when you turn the handle to the off position. You may also get a drip at the handle itself. Furthermore, you may feel the handle getting increasingly more difficult to turn.
These conditions can be repaired easily enough. If you contact the manufacturer, they may send you free parts. The parts they send are new molded rubber parts that help the cartridge to seal. You will need to turn off the water to the house, remove the handle, and pull out the cartridge. From there you can replace the old rubber parts. Lubricate the cartridge and slide it back into the valve.
If you are going to install a new cartridge, you can follow the same steps above except that you obviously don’t have to worry about replacing the molded rubber parts since the new cartridge will have all new parts anyway.
Nothing says outdated like gold fixtures and accents: it’s time for a bathroom remodel. When you hear the word “remodel”, you start thinking big dollars, but it doesn’t have to be.
Just changing the finish from an outdated finish to a new one can do wonders.
There are a few modern finishes of which brushed nickel is one. When you go shopping, you want to carry that theme throughout the bathroom. You will want to replace the faucet and drain assembly to match, along with shower or tub fixtures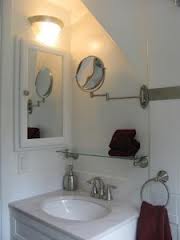 . Carry the finishes through to new light fixtures, towel bars, and toilet paper holders. You can also buy a matching soap dish and toothbrush holder, as well as cabinet door handles (and hinges if they are visible) for the vanity.
You get the idea here that you can start to get carried away. You might now start looking at door handles and hinges and changing them to the same finish as the bathroom fixtures.
Probably the largest expense will be the shower enclosure. If you have gold trim around it, you will need to replace it. I’ve seen some enclosures that have used a do-it-yourself kit to change colors, but it looks just a step better than spray paint.
Over the course of a weekend, you can totally change the appearance of your bathroom.
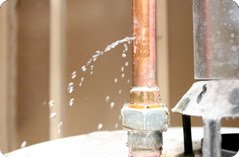 A pinhole plumbing leak in a supply line can leak plenty of water. I had a customer call and discover that when he was hanging a picture, a nail penetrated through the wall and into the pipe. Things were okay until he pulled out the nail.
For small repairs like this in copper, you can use a repair coupling. There are two types of repair couplings; one with internal stops and one without. You want to use the coupling without stops. This will allow you to move the coupling (also known as a sleeve) freely up and down the length of the pipe. To get the sleeve onto the pipe, you will need to cut the pipe at the pinhole location, and the coupling will span the damaged area. You will need to clean and flux the inside of the coupling and the outside of the pipe. Then you can slide the coupling into place.
Light the torch and heat up the area. Touch the solder to the opposite side of where you are holding the flame to make sure the entire joint is hot enough for the solder to flow. Once the solder melts and flows into the joint, you can turn the torch off, clean up the area and turn the water back on to check for leaks.
.JPG) If you are creating a casual area with base cabinets and a countertop, you will need to plan how to finish the exposed edge of the counter. This can be done in several ways and each is pretty easy.
If you are creating a casual area with base cabinets and a countertop, you will need to plan how to finish the exposed edge of the counter. This can be done in several ways and each is pretty easy.
The most basic is to use iron-on edging. This is a thin veneer with adhesive on the back of it. You hold it up to the exposed edge and run a hot iron on it to activate the adhesive. You can trim it and stain it to match the surrounding surface.
You can also install a piece of molding on the edge. In many cases the supplier has a selection of moldings that are pre-finished to match the surrounding cabinets and top. This is the easiest method to use if you are looking for a dead-on match of the cabinetry.
The only question is whether to nail it or glue it in place. If you nail it, you will need to fill the holes which never appear as well as an unbroken finish. The other option is to use adhesive to join the strip to the edge of the countertop. This is a great way to maintain the appearance of the strip of molding. You have to use plenty of strips of painter’s tape to hold it in place until it dries. This can be tricky…once the surfaces are wet they will slide all over the place. So, have the strips of tape ready and tape it in place. Then you can add more strips to fine tune the placement of the strip and make sure it is exactly where you want it.
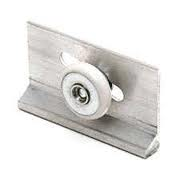 If you have sliding tub or shower doors that are stuck, you should first focus your attention at the top of the doors.
If you are looking to just open the doors to service the rollers (likely the root cause of the problem), you should be able to lift the door slightly and gently move it down the head rail. That will at least allow you to enter the tub/shower to fix the problem.
You might get lucky and find that one of the wheel assemblies is no longer riding on the track. This fix will be simply lifting that side of the door up and placing it so that the wheels are aligned with the track and it should roll smoothly.
It may also be that the wheel assembly has come loose and needs to be adjusted. You will need to remove the door to get access to the screws that hold these in place. Lift up the door and swing the bottom out. Then you can clear the top of the door from the head rail. The vinyl wheels don’t normally get ruined because the door isn’t that heavy. However, if they look bad, now is a good time to replace them.
Adjust the wheel assembly so that it is in the middle of the adjustment range. Rehang the door and see if it rolls smoothly. If they don’t adjust the wheels downward to lift the door slightly higher from the bottom track.
 Hanging items on a block wall is really a great beginning handyman job. The hurdle is what to use to support the weight, and how to you get it into the block?
Normally, the things people hang on a block wall are somewhat heavy. I’ve seen a lot of Southwestern design items made of wrought iron that hang. They aren’t super heavy, but they aren’t like hanging a small picture either.
I like using masonry screws or tapcon screws for this. In using these, the job does become much like hanging a picture. Most of the outdoor items you will hang will have a point to hang them from or will have a hanger on the back.
Pick a spot on the wall and drill your hole. It is easier to drill into the block itself rather than the mortar in between the blocks. Also, the bit doesn’t tend to wander in the block like it would in the mortar.
Drill to a depth that is appropriate for the screw and then turn the screw into the hole. You obviously want to leave the head out enough so that the item can comfortably rest on it. You may also want to paint the head of the screw so that it blends in with the object you are hanging from it.
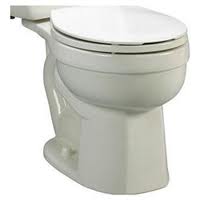 Tightening toilet bolts is a fickle business. Whether you are working on the tank-to-bowl connection or bowl-to-floor connection, there is that fine line to want to creep up to but not pass.
Toilets are made of vitreous china and if you put too much stress on them they can crack. So the question of how tight do you tighten bolts becomes how good is good enough. If you continue to tighten toilet bolts, the toilet will crack, so you have to know when to stop. The only problem is that usually only comes with experience.
I would first suggest using a very small wrench. This will make it so you are cognizant of the pressure you are placing on the bolt and nut. If you use a large wrench, you gain leverage on your side and in my opinion are more likely to crack the toilet. So use a small wrench and take incremental turns on it. Tighten it slightly and check for movement of the bowl or tank, whichever you are working on. Also, alternate tightening the opposing sides of the piece you are working on. Whether or not it is a bowl or tank, tighten one side slightly and then the other slightly then test for movement. If you hear a “crack” you will be buying a new piece.
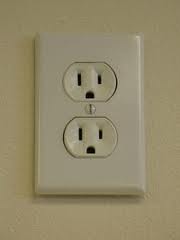 Replacing an electrical outlet is a very straightforward job. When you connect the wires to an outlet, there are different ways to do it.
You might notice that in the back of an outlet are holes where you can push the tip of the copper wire into. The metal connector inside the outlet holds the wire in place. To release the wire, you place something small into an orifice near the hole and it releases the wire. The problem is that these don’t always work as they are supposed to. If the wire has been repeatedly pushed in and out, the wire can have the tendency to pop out of place. That is never a good thing.
Personally, I prefer to wrap the wire around the terminal screw and then tighten the screw down upon the wire. That way I can see and feel the wire being held in place. Make sure when you wrap the wire around the terminal, that you wrap it clockwise around the screw. This is because as you tighten it if the wire moves it will move in the direction of the tightening motion. If you wrapped the wire counter-clockwise, the wire might tend to rotate away from the screw terminal and could possibly lose contact.
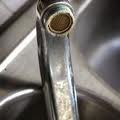 A leaking kitchen faucet presents a quandary of whether or not you should repair or replace the faucet. The answer depends on several things. Probably the biggest factor is the age of the faucet. If it is old you might lean more towards replacing it. Along with it being old, there are probably other parts in the faucet ready to break down, in addition to the styling of the faucet being outdated. So that all adds up to some serious consideration for replacement.
On the repair side of things, it may not cost you anything if you are somewhat handy. Several faucet manufacturers will warranty their faucets for life, but that doesn’t mean it will be easy, nor does it mean that you won’t be fixing something else on the faucet next month. However, a lifetime warranty is a lifetime warranty…actually I believe they phrase it as a limited lifetime warranty.
In some cases, they will replace the faucet (not including the labor to install it), but that is usually a chore to get done as well. The manufacturer may give it to you for free, or they may deeply discount the new faucet, or they may ask you to pay shipping and handling. Regardless, it is certainly worth a phone call to try to get a bargain.