Have you ever lifted up the cover of your sprinkler box? The first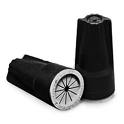 thing this handyman notices is all the bugs that scatter when they see daylight. You might also notice a tangled mess of wiring that may or may not be laying in water. This water can be a big source of problems for the wire connections, not to mention the fact that you have a leaking sprinkler valve.
When sprinkler valves are wired together, it is common for most homeowners to use regular wire nuts. These do a great job of holding the ends of the wires together, but not so good at keeping water out of the connections. For this you can use water-proof wire nuts.
Water proof wire nuts are larger than standard wire nuts and are filled with silicone to form a barrier against water infiltration. With standard wire nuts there is a female threaded fitting inside the wire nut and all you need to do is stick the wires inside the nut and screw it on. This twisting action joins the ends of the wires and hold them for a good connection. With water proof wire nuts, I generally hold the ends of the wires together with pliers and twist them together before sticking them into the wire nut. At least in my mind, I want to disturb the silicone filled wire nut as little as possible. Once inserted into the wire nut, I will give it a gentle twist and then use black electrical tape at the base of the nut to hold it to the wires so that nothing moves. This will also form another barrier against water.
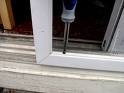
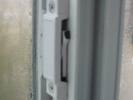 Many window locks are plastic that break off or crack when you try to lock them. These are integral locks that are built-in to the frame and replaceable. Your choice is to find a replacement (which won't be available at a home center) or buy a generic thumbscrew type lock mechanism. You shouldn't need a handyman to install either style of lock.
If you want to install an exact replacement, you will need to remove the old lock and take it with you to a glass shop. The old lock will be held in place by 2 screws. The bulk of this job is in finding the right lock and color. When you find the right lock (it‘s actually more of a latch), just screw it back into place.
If you want a locking window at minimal effort, you can buy a thumbscrew type lock. These generally come in black or white and take about 2 seconds to install. They simply secure to the track next to the window and stop it from moving. They will match the color of the window frame and will definitely prevent the window from opening, but they will be slightly noticeable so if you are picky, you might consider spending the time to find a matching replacement.
 As a handyman, I've worked in some rough areas before...areas with lots of chain link fencing. Besides chain link, these areas all have security bars on the windows and doors. You may not live in a rough area, but you can take a lesson here, many residences have security doors on them to avoid a break-in.
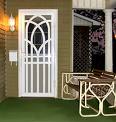
It used to be that a security door was plain ugly...just bars and maybe some mesh on them. Very seldom was there any type of decorative features. You can get designs that make these much more attractive than in the past.
If you want to install a security door, there are fairly straightforward. You need to determine how you want the door to swing, either right-hand or left-hand hinge.
If you install the hinge on the same side as the door it is protecting, the door handles will hit when you close the security door. The nice thing about this configuration is that you it is easy ingress and egress without having to fight the doors. If you install the security door so that the hinge is opposite the home's door, the handles won't hit but it is strange and somewhat backwards to go from side to side to get into your house. Plus, when the wind is blowing just right, you will get bumped around fighting with the security door to get your main door open.
For me, I would rather have both doors hinged on the same side, and just reverse the lockset and knob on the security door.
A customer was out of town for a few days and came back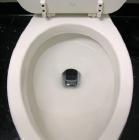 to discover that the toilet bowl was empty. Usually there is standing water in the bowl, but it was dry. She called her favorite Las Vegas handyman to determine why.
There are only a few reasons why this would happen. The first reason turned out to be the cause. The had a crack in the trapway of the toilet, which caused the water to drain out into the drain pipe below. This wasn't obvious because the crack was centered over the drain, and therefore didn't leave any water around the base of the toilet. Since the crack was small, it took some time for it to go dry. Naturally, if the toilet is being used regularly, the bowl will get refilled after each use, and you probably wouldn't notice a slightly lower water level. However, when the toilet wasn't used for a few days, it had time to go completely dry. The fix here was to replace the toilet bowl.
Another reason a toilet bowl will be dry is due to the vent. Drains require air, and the vent provides this. If the vent is clogged then as the water goes down the drain it tends to pull air with it from any source. This creates a siphon and pulls the water left in the bowl down with it. It won't pull all of the water down with it, but if the toilet is not used for a while the small amount of remaining water may evaporate. The fix for this would be to clear the vent from the roof.
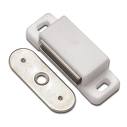 Have you ever closed the kitchen cabinet and it doesn't close all the way? Maybe the door is warped, or there is a problem with a hinge, or whatever. The answer is a catch.
A catch is a term for a mechanism that holds the door to the frame. There are many types of catches, that work with friction. For example, a female receiving piece that mounts to the frame receives a mating male piece that mounts to the door. When closed, the pieces interlock and force is required to separate them to open the door.
The type of catches this handyman likes are magnetic. They are easy to install and operate with very little effort. The magnetic piece mounts to the side or top of the cabinet frame and a flat metal piece screws to the inside of the cabinet door, so you will never see them when the door is closed.
The only thing to be careful of is that you must pre-drill the holes for the screws, especially in solid wood. Also be careful not to drill to deeply in the cabinet door. Drill just deep enough so that the hole accepts the screw, but no deeper. The last thing you want to do is drill a hold through your cabinet door.
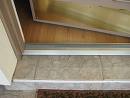 Over time, a threshold can become damaged and need replacement. If you have a gap between the bottom of the door and the threshold, you may be able to avoid replacing the threshold and have your handyman install a new sweep on the bottom of the door instead.
The proceedure is easy: simply slide the sweep along the bottom of the door and secure it. If this doesn't do the trick, then replacing the threshold is the next step.
The threshold is originally installed as a pre-hung door unit along with the jambs and it slides into the framed opening for the door. The threshold is usually nailed or stapled to the side jambs. Usually, adhesive or caulking is laid down under the threshold to keep out the weather and bugs.
To remove the threshold, you will probably need to cut it in the middle and shimmy it out. You can do this with a back saw or a reciprocating saw, and you may need to break the bead of caulking or adhesive to free it up.
Removing it from the side jambs is next, and you may be able to lift up the threshold from the point where you cut it and pivot the end up to pull it away from the side jambs. you can also try moving it in a back-and-forth motion. It's a little like yanking out a tooth, minus the blood. Once the old threshold is out, pull out any remaining nails from the side jambs.
You must buy a threshold of the same style that will fit the opening. I had a customer that had a double door and she bought two smaller thresholds with the idea that she would just butt them together to span the opening-bad move. If you need to special order a size, then do it.
Once you have the correct one, swing the door out of the way or remove it so you can install the new threshold, which will screw into the floor. If you are installing over a wood subfloor, you can screw it into the wood. If you are installing into concrete, lay the threshold into place and mark the spots on the concrete and then you can drill the holes with a masonry bit.
Lay down a couple of thick beads of adhesive caulking so that when you install the threshold there won't be any gaps for insects or breezes. Use Tapcon anchors (about $10 per package) and screw the threshold into place.
Swing the door (or rehang it if you had to remove it) back into place and check the fit. The door should close easily and the sweep on the bottom of the door should just make contact with the top of the threshold. A slight rubbing of the sweep against the top of the threshold is expected. There shouldn't be any gaps under the door whatsoever.
From inside the house with the door closed, look under the door for
daylight. If you see daylight (assuming you are doing this during the daytime) then you need to make some adjustments.
The threshold will have some adjusting screws which are countersunk into the top of it. You can turn the screws clockwise to decrease the rubbing and increase the space between the door and threshold.
By turning the screws counterclockwise, you will close this gap. If you have adjusted the screws as far down as they can go and you still have difficulty closing the door, as a last resort you may have to remove the door and plane off a small amount from the bottom of it.
When you're done, lay a bead of clear silicone along the sides of the threshold where it meets the side jambs of the door. Then you will be ready to start swinging and slamming.
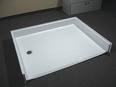 When it comes time to replace your fiberglass shower pan, you obviously don't want to have any movement in it. So whether you or your handyman is going to install it, pay attention.
Under a fiberglass shower pan is a webbing of sorts, small vertical supports that make it so that the shower pan won't "give" when a heavy person steps on it. This deflection can crack the pan, or even cause the drain connection to fail where it connects to the pan. Well made shower pans have more substantial supports, while the cheaper pans have less substantial ones. The floor upon which the shower pan rests might also be a factor if, for example, it is damaged or not level.
The answer then is to make the shower pan solid...very solid, particularly around the drain. You can do this my adding some thin-set mortar onto the floor before you seat the shower pan.
Once you have the pan lined up, mix up some thin-set mortar and pour it around the perimeter of the drain hole on the surface of the floor, whether it is the slab or an upstairs sub-floor. I would stay a few inches back from the drain hole and pour a ring about 12 inches wide around it. Then install the pan. You want the pan to sink in to the mortar. This is what will make the shower pan rock solid, and what a difference it will make.
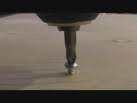 Have you ever had to install a screw into a piece of wood and it split open? I have too and I've learned a few handyman tips along the way.
If you have ever worked with solid hardwoods like oak or maple, if you've tried to install a screw into these without taking precautions, you have probably split the wood open. By that I mean you throw it into the scrap pile. Oak is particularly hard and troublesome.
1. Pre-Drill The Screw Hole
By pre-drilling a screw hole, you are removing a small amount of wood to make up for the otherwise displacement when you insert a screw. By pre-drilling, the hardwood doesn't have the pressure to split open as it would had the hole not been drilled. In other words, the space of the hole allows the screw to be inserted without placing the stress on the wood.
Sizing The Hole
I generally will hold the screw up and place a drill bit behind it. I want the hole in the wood to accommodate the shank of the screw, but allow the threads to bite into the wood for good holding power. So if I can see the drill bit peeking out on either side of the screw when I hold them front-to-back, the drill bit is too large and I move to the next size down.
2. Lubricate The Screw
Lubricating the screw before you insert it in a hardwood will help it go in a little easier. I don't mean to put liquid on it, but what works very well is a bar of soap. Take the bar of soap (any brand will do), and run the screw threads against it. This will leave the threads with flakes on them, and as you twist the screw into the wood, it will sink into the wood very easy. Without doing this, you risk breaking off the screw or bolt in the wood.
 So your sliding screen door is trashed. Maybe the dog shredded the screen or the rollers don't roll so well anymore. You probably don't need a handyman for this repair, unless there is a good game on you want to see.
Screen doors are light-weight and roll on plastic (and occasionally metal) wheels. You can buy replacements for these wheels if the door is not rolling smoothly. You will have to lift the door up and out of the track, and lay the door on it's side. The wheels are held in place with one or two screws.
If the screen is damaged, you can re-screen the door in under one hour, but if the frame is at all damaged you might as well replace it. You might consider replacing anyway if you want to save some time.
A new sliding screen door costs about $50.00 and installs very quickly. Once you remove it from the packaging, set it in the track and turn the wheel adjustment screw on the bottom rail (although rarely you might find this on the edge of the door). You want the wheels to travel freely down the length of the track. Although the adjusting mechanisms are slightly different, you just need a screwdriver to raise the frame of the door off the track.
On some models, there is a top piece that is spring-loaded to allow the door to be tall enough to ride in the top track. You can adjust this in the same manner so that the door is tall enough not to fall out.
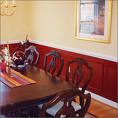 We were asked by a customer to do some drywall repair that had been damaged by the backs of some chairs. These were wooded chairs that when people would push away from the dinner table the chairs would ram into the drywall and chip away the paint and texture. Sure, this handyman can do that. However, there may be a better solution.
Repairing the drywall will look great....until someone rams the same chair into the same spot...again and again. It seems to me that installing some chair rail is a great option.
Chair rail will not only cover the damage and be more resistant than drywall, but it will make future damage easy to repair. You can buy a variety of sizes and profiles of chair rail to fit against the wall. In this case, simply buy a height that will cover the repetitive damage, but also works will with the size of the room. If the ceilings are high, you can go with a taller chair rail. If you have 8 foot ceilings, try to minimize the height so as not to make the room appear small.
You can paint the chair rail before you install it, nail it to the wall, and then fill and touch up the nail holes. The next time someone damages that area of the wall, the wood chair rail will probably be undamaged, but when it gets time to repair it, just fill in the dings and touch up the paint.