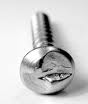
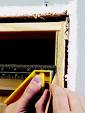
 If you have grown tired of your old security door and want to replace it, you will have to remove the one-way screws. These are screws that are not meant to be removed. They have a domed head with the slot cut in such a way that you can only tighten it, not loosen it. One-way screws make it difficult for an intruder to remove the door rather than defeating the locks.
Removing these screws appears difficult for obvious reasons, and if you don’t have the right tools, they are. There are several ways to remove one-way screws and each will take no more than a few minutes to do. You will re-install your new doors with the one-way screws that come with it.
You can buy a specialized tool to remove these, but you have to use low torque settings and slow speeds in a drill driver to hope that they work.
Since the head of the screws are dome-shaped, they have plenty of meat there in which to cut. One way to back the screw out is to take a hacksaw or grinder and cut a slot into the head of the screw. Take it slow, keep a steady hand and cut a new slot perpendicular to the old one. Make it deep enough so that a screwdriver will have enough metal to turn against, but not so deep that you split the head.
Another method is to make two opposing sides of the head flat so that you can use a wrench to turn out the screw. You can use a file or a grinder to flatted the sides. Realize that you will damage the old door frame by filing down the screw, but you are replacing it anyway. If you want to protect the old frame, you can set a piece of sheet metal or roof flashing over it. Once the sides are flattened, you can use vise grips or channel locks to remove the screw.
You can also flatted the top of the screw head and then use a screw extractor to remove it. One type of screw extractor, called an “EZ Out”, involves drilling a hole into the top of the screw and then inserting the reverse threaded bit and backing it out.
Your final alternative is to cut off the screw heads. This will leave you with the exposed shank which you can grab with vise grips and unscrew.
 At some point you will have a carpentry job that will require you to find wall studs. When you most need it, your stud finder will be out of battery life. Now you’ll have to go back to the Neanderthal days to find wall studs (like 1975). Here are some of the easier ways.
You can certainly knock on the wall horizontally until the hollow sound becomes more of a solid sound. You could also try shining a bright light down the wall and look for small humps in the wall, or you could apply some reason.
Openings in walls (like doors and windows) will have wall studs next to them for strength. You can measure out 16” from this point and at least you will be close. Also, during new construction, electrical boxes (outlets and switches) are secured to wall studs on one side. You can either use the knocking technique or take off the face plate of the outlet or switch and look through the gap between the drywall and box to see which side the stud is lying. Lastly, you can always remove a strip of baseboard and look behind it. You will see where the drywall has been nailed to the studs, but don’t always trust that. You can cut away a little of the drywall to be sure as the baseboard will cover it up anyway.
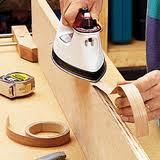 Some carpentry jobs are odd. Take for example a counter top edge that has become damaged like laminate or even melamine shelving… Even the edge of a wood grained board. These can all be repaired using the correct adhesive backed strips and an old clothes iron.
Instead of buying solid wood, woodworkers can buy laminated veneer plywood. This sheet looks like a piece of solid wood until you look at the edges. At the edges it looks like typical plywood. You can buy strips of the veneer that have an adhesive backing on them. They are usually ¾ inch thick, so you may not have to shave them down or you might have to if you are using a thinner stock.
Heat up the iron hot enough to activate the glue and run the iron along the top of the strip. The heat will cause the adhesive to melt and the strips will stick to the edge of the plywood. Once you heat up the strip of wood and while the glue is still somewhat pliable, use a roller and press the veneer strip down onto the plywood edge. You want good contact with no gaps. If you wait too long, you risk allowing the veneer to lift off of the edge and create a gap.
This process can be used for some laminate countertop edges and also melamine shelving.
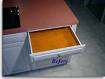 How many times have you pulled out the kitchen drawer and it flops down into your hand. Chances are good that the guide has broken. Drawers are installed in a variety of ways, put when it flops down it usually indicates that the rear guide has broken in some manner. Drawer guides have either guides on either side of them or a plastic guide attached to the rear of the drawer.
If the drawer flops down, it is likely that the plastic guide at the rear of the drawer has broken, since if one of the 2 guides mounted on the sides should still keep it relatively in place.
Pull the drawer out of the cabinet and inspect the guide. They ride in a groove at the top of the cabinet’s opening and will either break off or just come loose from the back of the drawer. They are usually stapled to the top rear of the drawer, so it may just have come loose and fallen off. You can re-staple it and put the drawer back in.
If you need a new guide, most home centers carry a good variety. Bring the old guide with you and match it up. Some guides are even coded by color. Re-secure it back on the drawer and install it into the cabinet.
 A lot of homeowners don’t like the looks of a traditional medicine cabinet, and consequently want it removed. There are two methods of installation; surface mounted or recessed.
A surface mounted medicine cabinet is very easy. Imagine just sticking the medicine cabinet to the wall…it simply mounts to the surface. It will be held in place with four screws, one in each corner. Remove the bottom screws first, support the weight of the cabinet, and remove the top screws. You will have to repair the small screw holes in the drywall, but this will be easy with either drywall compound or spackle.
A recessed medicine cabinet will be more challenging. Start by using a sharp utility knife and cutting the caulking bead around the perimeter of the cabinet. The recessed cabinet will also be held in place by screws. Look for one in each corner and remove them, then gently goose the cabinet out of the hole. You will be left with a drywall hole in your wall to repair. Since the recessed medicine cabinet is usually sandwiched between two wall studs, you will have to patch the hole, and blend it in with the surrounding surface. Here is an article on drywall repair.
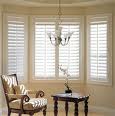
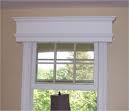 Dressing up a window by installing cornice boxes can turn a drab window into a real piece of art. You can buy a cornice box or make one yourself. Here is some information on how to make a cornice box. Once you have the cornice box ready, installing it is not difficult and will probably take 30 minutes or less.
The easiest way to install cornice boxes is with "L" brackets. These are brackets shaped like the letter L. One leg of the bracket will attach to the wall and the other leg will attach to the underside of the top of the cornice box. The bracket will be mounted upside down so that the leg extends off of the top of the bracket rather than the bottom. In this manner, the bracket is completely hidden by the cornice box.
Draw a level line above the window on the wall. This will be the line that will dictate where you install the brackets, so you will need to play with the height of the line to get the height of the cornice box correct. It's a good idea to have a helper hold the box up and you can tell him to raise or lower the box to get the look you are looking for. When you have the height right, mark your line and screw the brackets to the wall. Make sure you install the brackets into wall studs. If you have a small window you may only need 2 brackets, but for safety and to prevent bowing of the cornice box, installing a bracket on each stud that spans the window is a good choice. You will likely find a solid header above the window if you are mounting the cornice box low to the top of the window. Try a bracket every 2 feet in this case and look for and bowing or deflection in the box. The general rule is the more brackets the better.
Once you have the brackets installed to the wall, you can set the cornice box on top of the brackets and insert screws from the underside , through the brackets and into the top of the cornice boxes header. The screws shouldn't penetrate through the top of the box, as their purpose is just to hold the cornice box in place.
 If you have shutters on your windows, consider yourself lucky. They are very nice, but can also be pricey. Occasionally, shutters will need a little TLC with some minor carpentry repairs.
Shutter panels don't get opened and closed much like the louvers do, but when they do, they swing open like a door. They are held closed in the frame by a catch, similar to what you might find on some cabinets. Rarely do you see a magnetic catch on shutters, usually it is a friction type catch.
For the most part, these catches get bent or damaged. If you are lucky, you may be able to straighten out the latch with pliers if it has gone askew. If you can't repair it, just buy a new one and replace it.
It is a matter of mounting the receiving end of the catch on the inside of the shutter frame where you can't see it. Then just line up the mating piece and screw it to the shutter door side so that when the meet, they hold. If it is a large shutter, it may take two catches, one mounted at the top and one on the bottom of the shutter.
 When you install a pre-hung door in an opening, you are going to have some nasty looking gaps and cuts. The gaps will be between the drywall and the perimeter of the door frame. This area is used to shim the door to make sure it is plumb and square. This helps the door to operate correctly.
Over these gaps is placed door trim or casing. It installs easily with a nail gun and a compressor, but you can certainly use the old hammer and 4d finish nails. The key is to have a reveal.
For door casing, a reveal is the small area that stands proud of the casing. It basically is the corner of the door frame as it is revealed from the edge of the casing. As you lay out the casing keep the reveal at a uniform 3/16ths of an inch all around the opening. It will give the installation a more attractive appearance. You can use an adjustable square and set it for this distance and then just mark a pencil line around the perimter of the jamb. This line is where the edge of you casing will stop.
Use a level and secure one side of the vertical jamb with 2 finish nails (the nail gun is perfect for this job-very quick and accurate), after cutting a 45-degree miter at the corner. I like to start on one side, cut the miters, and then continue across the top and down the other side. Once the door casing has been installed, you can install the baseboard square to the casing, or you can miter cut both pieces to make everything flow without any breaking points.
Once everything is installed, you can fill the holes, sand, and paint.
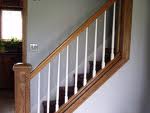 There are times when a wooden stair spindle or a spindle on a railing will break which requires replacing the broken spindle. This small carpentry job is all about finding or making a replica of the broken spindle.
You should remove the broken spindle and take it with you to find the new one. The first places to start would be the larger big box stores, and then after that you can try specialty stair manufacturers. If they don't carry them, they can make one for you or refer you to someone who can. If you have a lathe, you can turn one yourself after getting the right species of wood. Most of us though will have to pay someone to make a replacement.
If your broken spindle is on a stair railing, you will have to ream out the hole in the railing that holds the spindle. Find the appropriate drill bit and clean up the hole. Then measure the length and the angle at the bottom where the spindle will sit. Cut the bottom of the spindle to match this angle.
Once the length and angle are correct, glue the top of the spindle into the hole on the underside of the railing, and swing the bottom into place. Glue and nail the bottom into place.
If your railing is level, in other words doesn't go up or down stairs, you can use the same strategy, just toenail the bottom of the spindle into the base.
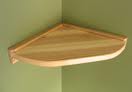 If that corner in your room is beckoning you to do something with it, you might try installing a corner shelf there to put pictures, books, or maybe even a TV. So here is how a Las Vegas handyman goes about it?
You can buy a corner shelf at a home center, but these tend to be a little small for storing or displaying anything of substance. You can certainly make one out of solid wood, MDF (medium density fiberboard), or even melamine, but you will have to install a decorative edge on the melamine or you want to curve the shelf. You need to figure out the size and whether you want the shelf curved or straight across. After that it is a matter of determining how you want the shelf to appear...paint, stained and varnished...you decide.
So all that is left is to install the shelf in the corner. I like to use 2 ledger boards for this. You can use 1"x2"s and, after making sure they are level, screw them at your designated height into the wall studs. The shelf will sit on top of these boards and get secured to them with countersunk screws.
If you need a little extra support for a heavier object (like a TV), you can install some cross braces using the same 1"x2"(or larger) wood supports that span from one ledger board to the other. These cross supports will minimize deflection and give the shelf more stability.