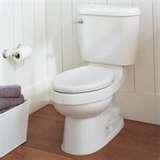
 Toilet leaks can have many causes. Its pretty common that there will all of a sudden be water on the floor around the toilet. What caused it? That is for you to find out. I would start out looking at the valve on the wall and follow it up to the tank. Look carefully as water can leak very slowly. Grab some toilet paper and touch the parts with it. Toilet paper will turn wet with the slightest amount of water and so it is a good test to find the leak.
If everything appears dry at the valve and supply line, move to where the tank connects to the bowl. This is a leak prone area where either the tank bolts corrode and break, or someone leans back on the toilet and cracks the tank. Flush the toilet and check for leaks. It may be that you need to remove the toilet tank and replace the spud and bolts and washers.
If all of this appears to be water tight, you probably have to replace the wax ring and bolts. The wax ring is found underneath the toilet bowl and so you need to disconnect the water supply and physically remove the toilet from the floor. Here is an article on how to replace a toilet wax ring and bolts.
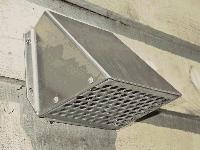 This Las Vegas Handyman has seen some wall penetrations provide easy entry for pests. Dryer vents, if they don’t have a cover, are loved by pests because they provide nice warm, humid air. So it’s a good idea to provide a cover to keep out pests and the weather.
A vent cover attaches from the exterior of the wall and secures to the vent. Some covers are simply screens with a hood over them, and others are louvered so that the force of the expelled air forces the louvers to open.
Whichever style you choose, they install in the same manner. You will want to squeeze out a thick bead of caulking around the exterior perimeter of the hole. Place the vent cover into the hole in the wall and push so that the caulking in between the wall and the cover gets squeezed. This will help keep rain water from entering the area. Once you secure the cover to the wall, the vent from the dryer to the cover will need to be connected. Usually a few self-tapping screws and some foil tape are all that is needed for this step. Once you have everything together, go back and caulk around the perimeter of the vent cover to further stop the weather from getting behind the cover.
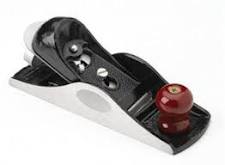 Occasionally you will notice that your door will bind at a particular area. You could make adjustments to hinges or knuckles and try to figure out why this is happening, or you could grab a block plane.
Sometimes a door will bind due to weather. If it is humid for a certain period of time, you may find that the door sticks. This condition will often disappear once the humidity goes away, but if it bothers you, you can plane the door.
Block planes come in many sizes, but more importantly is how well the plane is tuned. A well tuned block plane can shave wood thin enough so that you can read your morning newspaper through it. So wherever your door is binding, you can take thin successive passes and get the door to open and close without removing very much material. Of course, you will have to touch up the paint when you are done.
It’s easier if you remove the door from the hinges and plane the edge as it is held on the floor. However, if I can plane a door while it remains on the hinges, that is just one less step I have to do. Always use two hands when you plane, even if the plane fits in the palm of your hand. You will have more control over the cuts this way. I generally don’t plane past the edge of the door as this will tear out the end grain on the door. If you need to plane at the corner, start at the corner and plane inward. Also, turn the plane so that the blade is at an angle. It will take smaller shavings of wood this way and make it easier to push through the wood. It is better to take many small shavings than one big one that you may regret later.
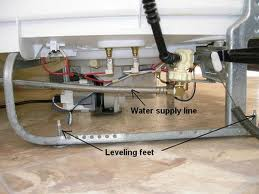 I had a frantic call from a homeowner today about her dishwasher. She needed to pull the dishwasher out of the cabinet and couldn’t get it out. She said the ceramic tile was blocking her from pulling it out. Apparently, she had some tile installed and the raised lip on it was blocking the feet on the dishwasher from moving.
I was able to talk her through it without too much trouble. She didn’t realize that the dishwasher was screwed into the cabinet underneath the counter.. After she opened the dishwasher door, I had her look up and remove the screws. This helped out quite a bit.
The next step was to create a little space in the opening. Somehow the feet needed to clear the extra height of the ceramic tile. Easy enough, just raise the feet. Actually, it’s more like lowering the dishwasher.
The front feet can be adjusted up or down so that the dishwasher fits uniformly into the opening. So my lowering the feet, you create space at the top of the dishwasher underneath the cabinet. This will allow you to lift the dishwasher up and over the lip of the tile and you can easily pull it out of the opening. Simply turn the feet clockwise (like you are tightening a screw).
 Painting doors is not a glamorous job, but questions arise about whether or not you should remove the door hardware before painting. It all comes down to personal preference and whether you thing masking the hardware is faster than removing it.
I would not recommend removing the door off of the hinges. So the quick answer for the hinges is to either paint them or cover them with tape. Personally, I don’t like how painted hinges look, especially if you have attractive hinges.
If you are using a sprayer, you will need to either remove the door knob and latch or cover them with masking tape and paper. If you asked 100 painters which way they preferred, you would probably find that 50% of them would cover them, and 50% would remove them. If you choose to remove them, you will need to cover them or place them in a room not being painted as the dry fall might land on them and you will have some cleaning to do.
Using tape and paper to cover them is fine, but if you don’t completely cover the surface, you will be cleaning paint off of the unit. Using standard masking tape works fine, but it is sometimes difficult to remove and will often leave a residue behind. Painters tape is more expensive, but it removes easier and doesn’t leave behind a residue, which will lessen your clean-up time.
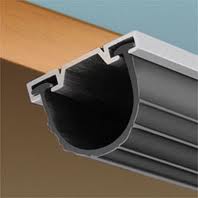 If you need to replace the weather stripping on the bottom of your garage door, take note to what style you have. Weather stripping is different for wood doors than it is for metal doors. The difference is at the bottom of the door and how it is secured to the door.
Weatherstripping for old wood doors needs to be removed and cleaned up. This weatherstripping is usually nailed or stapled to the bottom of the door. Pry this up with a screwdriver or putty knife and scrape the surface so that it is clean and smooth.
New weather stripping is sold in rolls and for wooden doors you can secure it with roofing nails or staples. Start at one end and start fastening until the strip is tight, but don’t stretch it.
For metal doors, there is usually a channel for the new roll. You can pull the old strip off and start threading the new strip into the channel. Some other styles for metal door bottoms have you screw the weather stripping into the bottom of the door. This is held in place with self-tapping sheet metal screws spaced approximately every 12 inches or so.
You will have to trim the end of the weather stripping to match the end of the door. A sharp blade will work for the rubber, but for the metal (if you have that style), tin snips or a hacksaw will work.
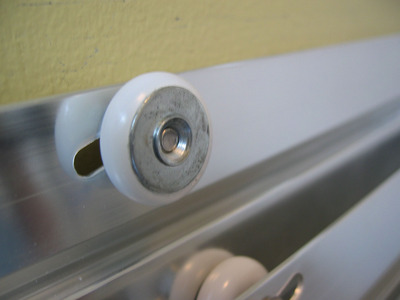 I received a call from a homeowner that his sliding shower doors were stuck and wouldn’t move. I agreed to come over and take a look.
His shower doors were not aligned in the track properly. These were doors that sit on a bathtub and effectively turn the bathtub into a shower. The same thing can also occur with a standard shower although the doors are much larger and heavier and so it is less likely to happen.
Sliding shower doors have a divider in the middle of the track to keep the doors separated and running true along the length of the track. The divider also prevents the doors from swinging into the shower. In this case, the outermost door had somehow become wedged on top of the divider and became stuck The customer confided that he was trying to adjust the door and lifted it up. That’s when it got stuck and he called for help.
In many cases the divider will crack or break. You can get replacements at any home center and install them easily.
I would not try to remove the doors unless I had to. It is awkward to lift the door up while tilting it to clear the divider and track. Plus, they are somewhat flimsy with a large piece of glass surrounded by a thin metal frame. If you need to adjust them, try lifting up one side, loosening the roller screw, and then adjust the wheel and retighten it.
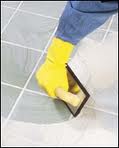 When you are done laying ceramic tile, the grout pulls everything together. You apply the grout with a grout float. I like the flexible floats rather than the rubbery firmer floats. I think the flexibility allows you to not only push the grout into the lines, but it also makes it easier to clean the excess grout from the top of the tiles.
After you mix up the grout and let it slake, mix it again and get some on the float and push it into the grout lines. There are two schools of thought on this. One is to dump an amount of grout on the tiles and move it around with the float into the voids. The other is to use a smaller amount on the float and place it more specifically into the voids. I think the first method creates a little more cleanup and so I prefer the 2nd method.
With grout on the float, pull the float diagonally across the grout lines. Fill the voids and then make a couple of diagonal passes with the float. This serves 2 purposes. First, it will give the grout line a smooth finished appearance, and second, it will help to wipe up any excess grout from the tiles.
If you have a tile that is slightly taller then the one next to it, make sure you pull the float towards the tile that is taller than the surrounding tiles. This will allow the grout to flow from the low tile to the tall tile and help hide the height difference.
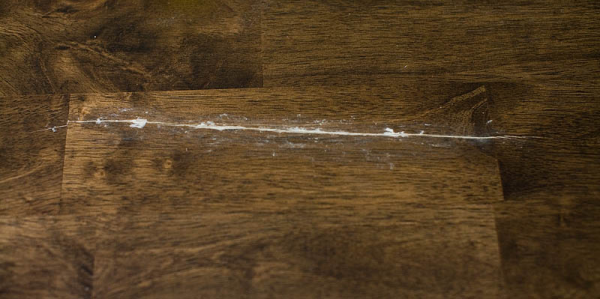 I found a piece of furniture that was going to be thrown away due to a series of scratches on the top. I figured this was a perfect opportunity to test out some handyman skills. It happened to be a table and the scratches were more like gouges. In fact, gouges is probably putting it mildly. This was a table with a gloss finish that had been mangled during a move. It had both deep and wide gouges.
Never having repaired furniture finishes before, I didn't hold out a lot of hope, but felt with the right process, it just might turn into a keeper.
I was pleasantly surprised by the finished product. I used three products for the repair. The first was a stainable wood filler. This filled the gouge to be flush with the rest of the surface. I applied this with a putty knife and cleaned the overfill off with a damp rag.
Once this dried, I stained the putty with a wood stain marker pen by Homax. I chose the closest color and applied thin coats to the putty. It seemed to take a while for the final color to appear. The initial color was light but darkened slightly as time passed. The final color was awfully close.
The finishing touch was matching the sheen of the table top. For this I used a scratch repair pen by Varathane. This applied a glossy finish on the repair that further helped it to blend in. It was too glossy initially, but after using a soft cloth, I was able to blend it in fairly well.
After I was satisfied with the finished product, I started to touch up smaller scratches. I didn't have to fill any of these and instead went right to the stain and gloss. This system worked beautifully to cover those.
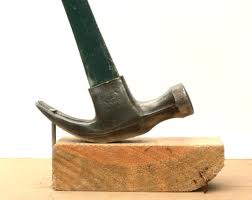 Every so often when working on a carpentry project, a nail will either break off or bend. I prefer to use a nail gun over a hammer, but strange things can happen with those too. If you find yourself with a nail situation, here are a few ideas.
If the nail is bent over, you can pull it out with the claw end of the hammer, or you can use a pry bar. Place something underneath the hammer or pry bar to protect the surface you are working on; a scrap piece of wood works well for this. Get some leverage on the bar and pull. The nail should come out, but sometimes the head will break off.
If the head breaks off, you can still try to get leverage with the hammer or pry bar, but instead of pulling back, push the handle to the side. This will sometimes bend the nail shank and sometimes pull it out.
If you have just a stub sticking out of the wood, you can try a cat’s claw. This actually digs into the wood and will damage the surface, so only use it as a last resort.
Sometimes you don’t need to remove the broken nail at all. Instead, try hitting it below the surface of the wood you are working on. Use a nail set and hammer it just below the surface. Then you can fill the divot flush with the surrounding surface.