 I was at a house yesterday and the door knob was literally falling off of the door. It was very loose lacked any kind of handyman maintenance for years. Door knobs are a fickle group. Some are well made and last for a long time. Others get neglected. With just a little TLC, a door knob will last for a very long time.
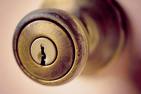
A door knob is installed after the latch assembly gets placed into the edge of the door. The latch is held in place with 2 small wood screws. Then the exterior side of the door knob is installed through the latch assembly. This is a good time to lubricate the hardware because you can turn the handle and see the mechanics of the latch move. Spray lubrication works great. Spray a light coat on the moving parts and rotate the handle to make sure the lubrication works its way into all the moving parts.
Mate the interior side of the door knob to the exterior side and tighten the two screws that hold it all together. There is a certain tightness that requires a little "feel" to it. If you over tighten the screws, the knob and/or latch tend to stick. If you under tighten, there is will be too much play and the knob won't operate well. Tighten it snugly but so that it operates correctly.
 Cabinet drawers seem to be made with cheaper and cheaper material. Have you noticed that if you set something moderately heavy in the drawer that the bottom will flex? It's almost like the drawer is ready to pop out of the groove that it sits in. Well, here is a handyman fix for the weak drawer bottom blues.
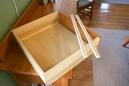
Builder grade cabinet drawer bottoms are made of a thin plywood or hardwood. It sits in a groove and moves freely in it. Larger cabinet drawers are more suseptible to the bottoms bowing out from the weight and consequently benefit the most from reinforcing it.
You can reinforce the drawer bottom by using a piece of plywood. Cut a 1/4" piece of plywood to fit under the drawer bottom but leave a 1/4" gap around the perimeter of the plywood. You will need to remove the drawer and turn it over. Once you have cut the plywood to fit, use yellow carpenter's glue and glue the plywood to the underside of the drawer, leaving a uniform gap around the perimeter. The gap will allow for seasonal movement yet make the drawer bottom rock solid. Place some weight on the mating pieces until the glue cures, approximately 24 hours.
 I can't tell you how many times I go into a house and the toilet paper holder is about to come off of the wall. People lean on them, use them as a grab bar, set coffee on them...and this Las Vegas handyman gets to fix them. These are held in place by some pretty flimsy hardware.
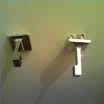
It's usually the case that one or both of the arms get loose and the plastic spring-loaded tube falls out. Most people can fix these but it takes a very small standard screwdriver (think eyeglass repair). Underneath each arm is a small screw that tightens against a bracket screwed to the wall. In most cases, if you can't just tighten the small screw, the bracket at the wall has lost it's bite and is loose. So you have to unscrew the arm and remove it to get access to the wall bracket. This will likely be source of the problem.
Over time with people putting weight on these, the weak wall anchors will create an oblong hole caused by the movement. You have a couple of options here. You can use a larger wall anchor, a molly bolt (aka butterfly bolt), or an EZ anchor. You could also move the location of the toilet paper holder, but if the decorative arms don't cover the old holes, you will have some additional repairs.
Once the bracket is secured to the wall, tighten the small screw on the arm to complete the repair. Then you can load the roll of toilet paper and you're in business.
 You notice that there is water on the floor around your refrigerator and decide to pull the fridge out away from the wall to see. Sure enough, there is water behind the refrigerator and the puddle is growing at the icemaker line. First things first, you need to troubleshoot the problem to find out if it is within your ability, or whether you need to call a handyman to do it.
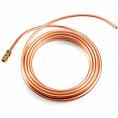
You will notice that behind the refrigerator is a small water line that goes to the wall. In modern houses, there is a small valve that controls the water flowing to the icemaker. Turn this valve off and start cleaning up the water. By the way, in some houses a water line is run from under the kitchen sink and hidden inside the base cabinets. If you don't see a valve right behind the fridge, it may be that it lies underneath the kitchen sink. You can turn off the water at the valve under the sink where this line is fed water.
After you have cleaned up the mess, it's time to turn the water back on and see where the leak develops. It will typically be at the valve behind the fridge, where the water line connects to the valve or icemaker, or that the line itself has a pinhole in it.
If the line is damaged, replace it with a steel-braided line. These are usually guaranteed against leaks for 10 years. If it is the valve, you might be able to tighten the cap nut or you may have to replace the valve. If the leak is coming from the icemaker, check the connection where the line meets the icemaker. You can disassemble it, clean it out and replace a washer, but if that doesn't fix it, you may be forced to call an appliance repair person.
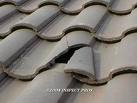 A handyman is asked to do many things, and at some point he or she will be asked to replace a roof tile. Roof tiles sometimes crack when stepped on, or need to be replaced when an overgrown tree knocks one off the roof during a strong wind. Obviously, if you are working on a roof, you have to be careful. Ladder safety is vital.
A big challenge is finding a matching roof tile. This is not as difficult as you might think, and remember it doesn't have to be perfect as the tile will be up on the roof and not as conspicuous.
1. Remove A Roof Tile
If you don't have the damaged tile, get one from the roof and bring it will you as a sample.
2. Visit A Boneyard
Roofing supply companies have areas in their yards that they call the "boneyard". The boneyard is a collection of roof tiles that are leftover, or scrap. Basically, tiles that get picked over to solve a small job. Match up the size and basic color, and style and take it home. If you are just taking one or two tiles, they will probably just give them to you, if you need several, expect to pay a few dollars apiece.
3. Cut And Install The Tile
If you need to cut a roof tile use a grinder with a masonry blade. You must use eye, ear, and breathing protection. The tile will sit on a wood ledger and gas built-in lugs to accomodate it. It's probably a good idea to use some roofing mastic or adhesive to further secure the tile.