 Drywall joint compound (known as “mud” in the trades) sands very easily. With the right tools and know-how, you can do a professional looking job.
Many people use heavy grit sandpaper to chew off the compound, while working the sandpaper with lots of pressure. This gets rid of compound fast, but leaves a nasty surface to finish. The heavy grit sandpaper will leave scratches and gouges, while excessive pressure will scuff the paper face on the drywall.
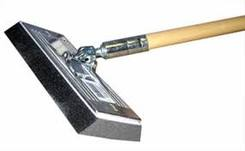
Try buying a drywall hand sander and some 120-150 grit sandpaper for it. The tool looks like a trowel and has a big surface to keep the finish level. It has a fat handle and some clamps to hold the paper as you work.
While you’re at it, buy a dust mask and some goggles to keep the dust out of your eyes and nose.
Assuming you have floated out the compound enough (the more you float it out, typically the less noticeable it will be.
Load the paper into the sander by clamping one side and wrapping the paper so it is taut on the sanding surface, then clamp the other side. This is important, because if there is play in the paper, you won’t have as much control over the sanding motion.
Hold the sander at a slight angle and use long uniform motions. Don’t hold the sander perfectly vertical or horizontal, but somewhere in between. The goal here is to blend in the surface so after it’s painted, you won’t be able to tell where the joints are.
For inside corners, use a sanding sponge with a tapered edge. If you try to use the hand sander here, you will gouge the opposite side and create more work, so sand within a few inches and then go to the sanding sponge. One edge of the sponge tapers to a sharp point which is perfect for finishing the corner. The grit of the sponge should be fine, so just run the sponge vertically on both sides of the corner until clean.
Unfortunately, you will have gouges and depressions in the surface, and many people try to sand these flaws out. Instead, just add another thin layer or two of joint compound. Use a 6-inch taping knife and scoop just a tiny amount of compound on its edge, then run it along the flaw. You can hit it with the sandpaper later.
Finally, you can use a hand-held work light and hold it against the wall so that its light shines along the wall. The light will cast shadows on your work and let you know which areas need more filling and sanding.