 At Las Vegas Handyman, one of the most popular calls we get is to repair a garbage disposal. One of the issues is that the garbage disposal can become loose. My guess is that this is probably the result of a careless installation job. However, a garbage disposal does have good torque and maybe if it gets bumped around by an under-counter garbage can, it theoretically could become unseated and vibrate loose (I think this is a stretch, but that’s why the law of probability exists).
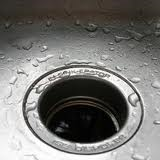
A garbage disposal can also become loose if it becomes jammed and instead of using a tool to unjam it, a broomstick is used. This can really cause some issues. Typically the disposal will come with a tool to clear a jam (or you can use an Allen wrench). Short of these, a homeowner will take to a broomstick and insert it into the disposal and try to dislodge it by pushing aggressively on the inside of the unit to free the grinding plate. Sometimes this works, but you can loosen the disposal and you may even be able to see the sink flex.
The repair is simple. The disposal has a mounting ring with ears on it that mate with the mounting assembly attached to the sink. They just fit together and you turn it clockwise until it bottoms out. If you have noticed that the disposal leaks from this area, it may be that that only two of the three ears were engaged. In this case you will have to remove the disposal from the mounting assembly and reinstall it. Of course if you remove the disposal, you will first need to remove anything that might impede its movement. This would include the side drain, and maybe the dishwasher air gap discharge hose. Plus, it’s always a good idea to unplug the disposal. Just line up the ears with the assembly and turn it until it bottoms out.
 Las Vegas Handyman repairs drywall every day. Lots of homeowners repair drywall as well, but may lack a little when it comes to matching the texture. Matching texture is not easy, but it is cheap and you can practice before you apply it to the wall.
Before you spray texture on a drywall repair, make sure the patch is good. It should be flat with no bumps. You can hold a shop light next to the patch and shine light along the wall. If the patch is not flat you will see shadows behind the uneven areas.
Once the patch is flat, use try to remove the borders of the patch. Grab a toothbrush and some warm water and use a swirling motion to minimize the border of the patch. You want to remove the drywall mud that has filled the surrounding texture.
For small patches, the aerosol cans of texture work great. Practice on a piece of cardboard or scrap material and get the spray pattern right. You can change the pressure in the can by holding it in cold or warm water. You can use the dial setting to control the size of the splatter. Practice until you have the right look. I generally start with a large sized splatter and then move to small splatter. It takes some playing with to get it looking right. Let it dry and then take one swipe with fine sandpaper in a sanding block to level the top of the texture.
 Las Vegas Handyman repairs garbage disposals, but before you call for service, try a few quick and easy fixes. If the disposal doesn't make noise when you turn it on, press the reset button on the underside of it. If the motor overheats or is overloaded, this button will trip and turn the motor off. Pressing the button back in will allow the motor to turn back on once you flip the wall switch (you should also test the outlet to make sure there is power getting to the disposal and, if not, check the breaker).
If the disposal makes a humming noise, but doesn't grind food, it is jammed. Most disposals come with a tool to clear a jam. If you have lost yours, you can use an Allen wrench. Take the tool and insert it in the
hole on the underside of the disposal. As you twist the tool, you will hear and feel the obstruction. Keep twisting until the blades move freely. If you still can't budge the blades, you'll need to remove the disposal
and manually clean out the obstacle. Some people use a broomstick through the top of the sink, but be careful you don’t damage the sink. On some thin stainless sinks, if you put too much pressure on the broomstick, the sink will tend to flex.
Once you get the disposal off of the sink, you can use a flashlight and take a peek down the neck of the disposal. You can pull the splash gasket off of the top to completely see into the unit. If you’ve had to come this far, the blockage is probably a broken piece of glass or a coin. You may need to use a screwdriver and try to pry the coin or glass from the blades.
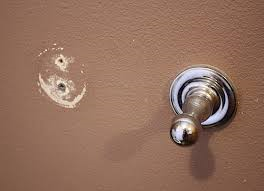 A loose toilet paper holder can be a real nuisance. It eventually will fall apart and someone will just stick the toilet paper on one of the arms sticking out from the wall. It is usually the case that one of the arms is loose from the wall. The way the arms are held in place is that there is a bracket that is secured to the wall, and then the arm is secured to the bracket with a small set screw.
You might get lucky and just have to tighten the setscrew. It is unlikely that this will totally fix the problem as it is usually the bracket that becomes loose from the wall…but you might get lucky.
To really fix the problem, you will have to loosen the set screw and remove the arm from the bracket. The set screw will be at the very bottom of the base of the arm where it meets the wall. The screw is very small and takes a standard screw driver.
When you get to the wall bracket you will see the screws holding it to the wall. In all likelihood the installer uses small plastic anchors that can’t withstand much stress. In this case, the screw will just turn and not tighten. If the bracket isn’t located over a wall stud (if it was the bracket would not be loose), use a toggle bolt (also known as a butterfly bolt). You will probably have to drill a larger hole in the wall to accept the head of the toggle, but it will hold tight. It is probably a good idea, depending on the shape of the bracket) to use two toggle bolts at opposing ends of the bracket.
Once the bracket is tight to the wall, replace the arm and tighten the set screw.
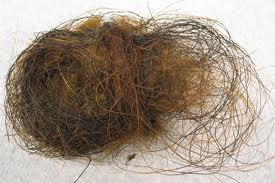 A clogged shower drain usually goes hand in hand with a bad smell. Drains have traps which keep the sewer gases from entering the living space, but that isn’t what normally causes the smell. People with long hair are plumber’s favorite people. The hair gets caught going down the drain and it combines with other hair, soap, and shampoo for a rat’s nest of foulness. Your job, should you choose to accept it, is to pull the rat’s nest out of the drain.
This isn’t as hard as it sounds. Commonly you will find the clump of hair in the trap so you only need to get a foot or so past the drain cover.
Remove the drain cover and use rubber gloves (the drain has plenty of germs down there). You can use a snake if you choose, but before you go through the hassle, try using some simple tools first. I like a product called a “Zip-it”. It is a cheap strip of plastic about 18” long that has small barbs on it. The idea is to push the strip into the ball of hair and the barbs will catch the clump and allow you to pull it out. It works very well when the clump is at the trap. You can also finagle a coat hanger with a small hook on the end of it, but this only works well if the clog is between the trap and the floor. In other words, the plastic goes around corners much better that a metal coat hanger. As a last resort you can always go rent or buy a snake, but these quick and cheap fixes just might save the day.
 Las Vegas handyman certainly does plenty of drywall repairs. Whether large or small, you can count on us. We encourage homeowners to attempt the easy ones, and then all us if they get into trouble or if the project is bigger than they are comfortable doing.
A common drywall repair is a doorknob hole that punctures the wall. You can do a traditional drywall repair using a wood backer, drywall, and float out the joint compound. You can also buy kits that make quick work of the repair.
The kit will include a template that you place around the damaged area. The template has to completely cover the damage. It is usually a large circular shape that you place over the damage. Draw a line at the template and cut out the along the line leaving a circular hole. The drywall plug that comes with the kit fits perfectly inside the circular hole that is left in the wall. It has a tape flap around it so that you can apply some mud and stick it in the hole. At that point you can just float the patch out to blend in just like a regular drywall repair. You can put a couple of coats on and then texture it to blend in with the surrounding wall.
As for painting the patch, if your house has been recently painted and you have kept the paint indoors, you are probably fine just to touch up the patch. If there is any doubt, you may want to paint the entire wall from corner to corner.
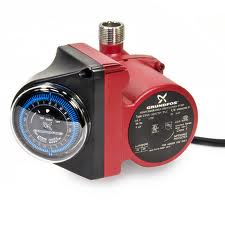 A water heater that uses a recirculating pump delivers hot water faster than a water heater without one. The pump pushes water through a loop installed throughout the house and allows hot water to be delivered to the fixtures much faster. The upside is that you don’t let a lot of cold water run down the drain, and the downside is that the heated water can give off a lot of its heat during it’s trip throughout the house. The water ends up back in the water heater at a lower temperature than when it left. I’m sure there are studies that say the water heater tends to run more due to this.
Anyway, if you’ve noticed that you are no longer getting near-instant hot water, check the pump. You might be thinking that the pump needs to be replaced, when the problem may be an easy fix. Certainly check to see that the outlet that the pump is plugged into is getting power. If it is not, it may just be a tripped GFI outlet that needs to be reset. The other possibility is that your pump may have a timer on it that is not set correctly. If there was a power outage your pump will be off for the amount of time that the power was out. Resetting the GFI outlet and checking the timer may solve your problem.
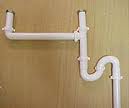 Sink piping sloped in such a way that keeps drain water in it can lead to a smelly sink drain. This can happen when a combination of situations occur.
Lots of homeowners have a garbage disposal, but there are folks that either don’t use it or don’t have one. So they are left to let debris run down the sink strainer. The strainer allows only small food particles to pass through and run down the drain. This is fine as long as the slope of the drain is correct and allows the water and debris to flow as it is designed. However, I have seen cases where the sink piping will elbow over to the main pipe, but the vertical drain pipe from the strainer (the tailpiece) is left slightly too long. This can cause an uphill rise in the horizontal pipe which will cause water and food debris to remain in the pipe…to rot and spoil.
The fix is to cut the tailpiece slightly shorter to the point that the rise in the horizontal section of drain is removed. In this way there is no pocket for the drain water to sit and “ferment” and smell up the room. The drain should be gravity fed and not have any uphill rises in the piping.
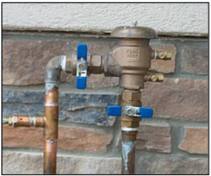 You don’t want your plumbing to freeze right? Well before the temperature drops too low, take action now.
It happens every year and people know it’s coming, yet they still don’t do anything about it…until it is too late. It seems the most obvious thing to freeze is the pressure vacuum breaker. These stick up out of the ground. The valve sits on two pipes and the entire assembly can freeze. The pipes and/or valve will split open against the incredible force of expanding ice. It is easier to buy $5 worth of pipe insulation and prevent it.
Pipe insulation comes with a split down one side so you can place it around the pipe (get the right diameter). Some insulation needs to be taped together and some has adhesive on the edges of the cut so that you can just mate the edges together and they seal around the pipe. At that point you can cut the insulation to length with a utility knife.
If you have any hose bibs that stick out far enough that the piping is exposed, you can add insulation there too.
There are specialty products available for these purposes too. You can buy an insulated dome that is made to look like a rock that you place over the valve. There are similar products for hose bibs.
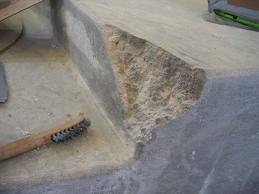 Fixing a damaged concrete step is surprisingly easy for you or your handyman. You probably have some of the necessary tools, so you will only need to buy, rent or borrow a few specialty tools.
You will first need to chip away any loose concrete to get to solid concrete so that the patch will hold. You can use a hand sledge or a 3-pound maul, and a brick chisel. Scrape the area with a wire brush and blow away any dust or residue.
Next, construct a form around the chipped step to hold the patch in place. Use 1-inch thick boards around the step. The width of the board depends upon the height of the step, but 1-inch by 8-inch is a good general dimension.
Attach the boards at a 90-degree angle using duplex nails (double-headed nails). Keep the boards from moving by driving 1-inch x 3-inch wooden stakes into the ground, and nail the form boards to the stakes. Apply a thin film of clean motor oil to the inside of the form boards so the patch doesn't stick to the boards.
Now that the form is in place, you will need to apply a "scrub coat." This is a mixture of liquid bonding agent and sifted pre-mixed sand mix. Dampen the area with a spray bottle and apply the scrub coat. Make sure that the scrub coat is still wet when you actually start filling the patch with the wet sand mix.
Concrete is always thirsty. If you start filling the patch with wet sand mix and you don't first dampen the surrounding concrete, the surrounding concrete will absorb the water from your patch, causing it to fail.
This repair is fairly small, so you will only need a bag or two of sand mix such as Quikrete or Sakrete (each bag costs a few dollars). This stuff is easier to mix than a cake mix, just a little water. Pour the sand mix in a bucket and add water to make a workable consistency. When you can squeeze a handful and it doesn't crumble or drip, you have the right consistency.
Fill the damaged step a little at a time with a pointing trowel (under $10), and pack down the mixture to squeeze out any air bubbles. Continue filling the area until it is slightly higher than the surrounding surface. Use a wood float (or a 1-inch x 4-inch board -- it's cheaper) and tilt it on its edge. Move the wood back and forth to pack down the wet sand mix, and let the whole thing sit for a few minutes. Place an edging tool (under $10) between the form board and patch. Using short strokes, shape the edges of the step. The edging tool forms the small curve on the step.
Let the patch sit about 45 minutes. If there is water still pooled on the surface, it's too wet. Periodically, press down on the patch with your thumb. If you leave only a light thumbprint, grab a magnesium float (under $20) and smooth it out. To texture the patch to match the surrounding concrete, use a stiff-bristled broom and brush the surface.
Wait 30 minutes more, and then remove the form boards. Use the edging tool to shape the vertical corner. You will want to keep the patch wet so that it cures properly. Spray the patch with a garden hose or spray bottle two or three times a day for three days. After that, moisten it twice a day for a week.